Hey everyone!
Today I have my final Halloween mani of this year. This is actually a design that I had planned on doing last year, but never got around to it. So I wasn't letting this Halloween season pass by without doing it! No sir!
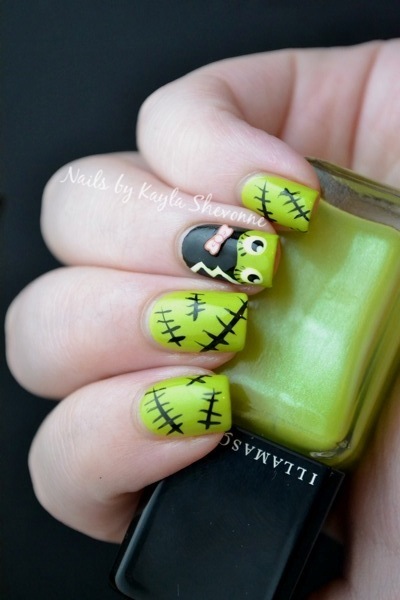
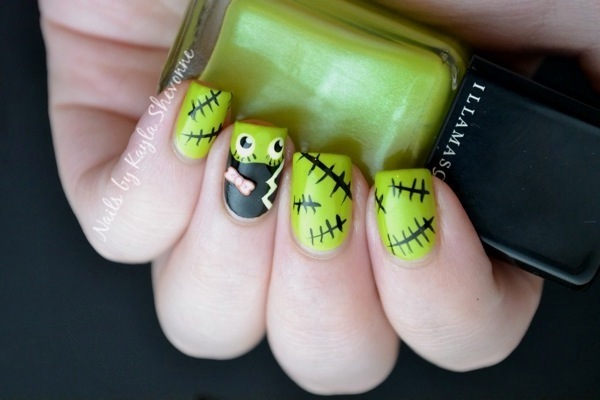
The base colour for this Bride of Frankenstein mani is Illamasqua Radium. I was going to use OPI Who the Shrek Are You?, which is the colour I used for my original Frankenstein design, but I liked the added shimmer that Radium offers.
Most of the detailing was done with the It's So Easy Stripe Rite Paint in Black, but I also used Wet 'n' Wild French White for the eyes and the detail in the hair. Oh and the little fimo bow was an afterthought, but I think it's totally cute!
I was lucky once again that the two breaks from my car door weren't so bad once I removed my polish and got a good look. A bit of filing made them presentable and they should grow back in no time. They're hard to see in photos because they're on the inside corners of my index and middle fingers, so they're kind of hidden, which I like.
Now that the Halloween season is just about over, I have to come up with some designs to wear in November! I've been feeling a little uninspired lately, so hopefully I'll get back in the groove soon.
Thanks for looking!
Thursday, October 25, 2012
Halloween Dotticure
Hi everyone!
Luckily, my break on my middle nail that I mentioned a few days ago wasn't quite as bad as I had thought. I still had to file my nails down shorter than I normally would, but I still have a little free edge to work with, so I'm pleased as punch with that.
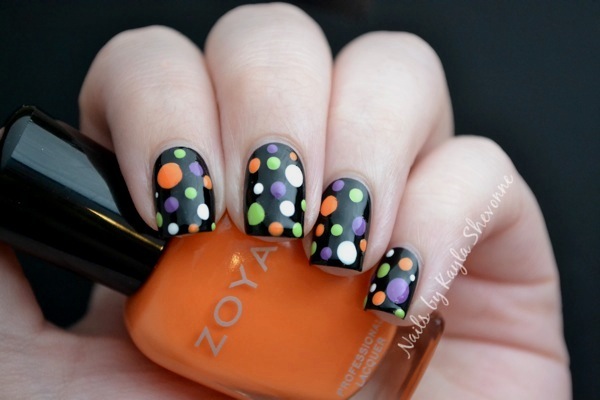
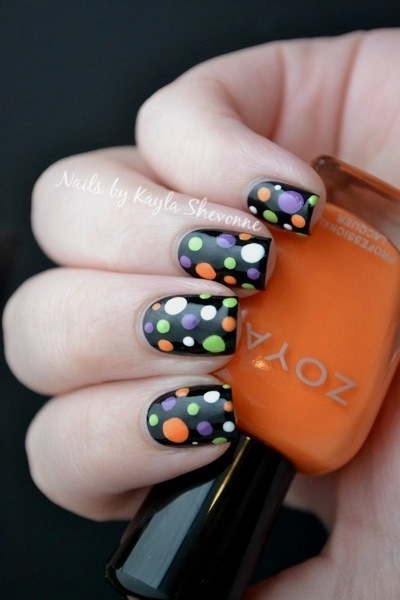
I found this cool image on google of a polka dot pumpkin and I thought that it would translate really well into a nail design. The pumpkin even has a K on it, so it was totally meant to be used as inspiration for me!
The base for this design is my go-to black creme - Wet 'n' Wild Black Creme. For the dots, I started by creating them all in white with a couple of different sized dotting tools. I did this because I wanted to ensure that the purple, orange and green stood out against the black. Speaking of the purple, orange and green, they are China Glaze Spontaneous, Zoya Arizona and Orly Green Apple, respectively.
I got SO many compliments on this design, it's unreal! I guess that although it feels like it's on the simple side, it's definitely still eye-catching.
I'm hoping to get some spare time this weekend to do some swatching so that I can have more to show you than just my nail designs. My swatching bin has reached the point of overflowing now, and it pains me every time I look at it!
Thanks for looking!
Luckily, my break on my middle nail that I mentioned a few days ago wasn't quite as bad as I had thought. I still had to file my nails down shorter than I normally would, but I still have a little free edge to work with, so I'm pleased as punch with that.
I found this cool image on google of a polka dot pumpkin and I thought that it would translate really well into a nail design. The pumpkin even has a K on it, so it was totally meant to be used as inspiration for me!
The base for this design is my go-to black creme - Wet 'n' Wild Black Creme. For the dots, I started by creating them all in white with a couple of different sized dotting tools. I did this because I wanted to ensure that the purple, orange and green stood out against the black. Speaking of the purple, orange and green, they are China Glaze Spontaneous, Zoya Arizona and Orly Green Apple, respectively.
I got SO many compliments on this design, it's unreal! I guess that although it feels like it's on the simple side, it's definitely still eye-catching.
I'm hoping to get some spare time this weekend to do some swatching so that I can have more to show you than just my nail designs. My swatching bin has reached the point of overflowing now, and it pains me every time I look at it!
Thanks for looking!
Tuesday, October 23, 2012
Orly Spellbound Collection - My Picks
Hey guys!
This year's Orly Halloween Collection consists of four polishes - three new Glam FX shades as well as a re-promote of Orly's black creme polish from their regular line.
I didn't pick up the black creme, and I skipped on one of the Glam FX shades because it seemed like something I'd seen before. The other two shades, however, are both unique and fun, so I'll be showing you those today.
_________________________________________________________________________________________________
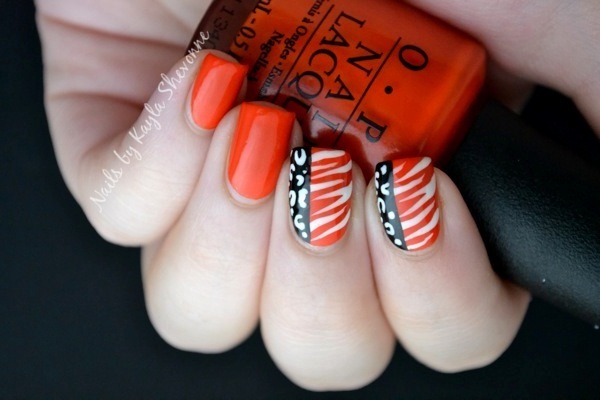
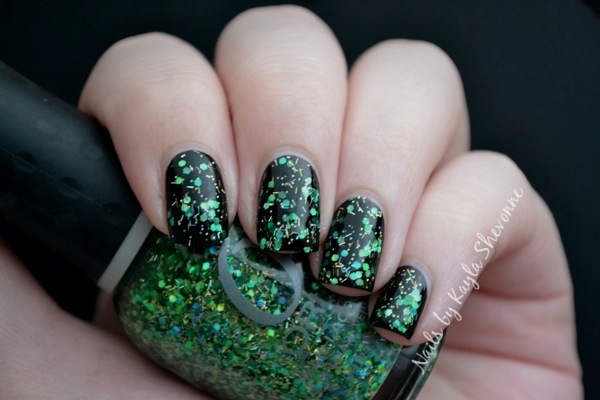
Monster Mash is a fun mix of green, teal and and holo glitters in a green tinted base. The glitters are small and larger hexes as well as short bars. Since the collection includes Orly's black creme, Liquid Vinyl, I figured it would be appropriate to use a black creme as the "underwear" for this polish. The formula was really easy to work with and my swatch is one coat over the black creme.
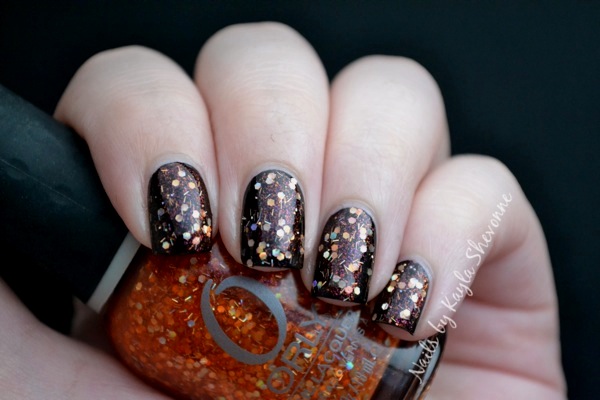
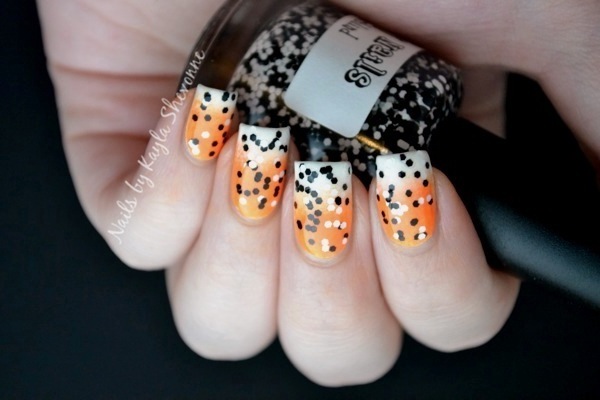
Right Amount of Evil is an orange tinted base with a mix of red, orange and holo glitters. The glitters range from super small and densely packed to larger hexes and short bars. The formula was also really great with this one and I once again layered it over a black creme.
The Orly Spellbound Collection is limited edition and available this month at Sally Beauty Supply.
What do you guys think of these two shades? Did you pick up any polishes from the Spellbound Collection?
This year's Orly Halloween Collection consists of four polishes - three new Glam FX shades as well as a re-promote of Orly's black creme polish from their regular line.
I didn't pick up the black creme, and I skipped on one of the Glam FX shades because it seemed like something I'd seen before. The other two shades, however, are both unique and fun, so I'll be showing you those today.
_________________________________________________________________________________________________
Monster Mash is a fun mix of green, teal and and holo glitters in a green tinted base. The glitters are small and larger hexes as well as short bars. Since the collection includes Orly's black creme, Liquid Vinyl, I figured it would be appropriate to use a black creme as the "underwear" for this polish. The formula was really easy to work with and my swatch is one coat over the black creme.
Right Amount of Evil is an orange tinted base with a mix of red, orange and holo glitters. The glitters range from super small and densely packed to larger hexes and short bars. The formula was also really great with this one and I once again layered it over a black creme.
The Orly Spellbound Collection is limited edition and available this month at Sally Beauty Supply.
What do you guys think of these two shades? Did you pick up any polishes from the Spellbound Collection?
Sunday, October 21, 2012
Halloween Nail Art - Haunted House
Hi everyone!
I'm so sorry that I haven't been around much lately! I've been really busy with work and for once, I didn't have any older photos lying around that I could use to create some posts while I've been too busy to swatch.
And then to make matters worse, I was going to do some swatching today, that is until I got a bad break on my middle nail last night. Ugh! So this coming week might be scarce in terms of posting as well. I'll try to get back on track as soon as possible though!
Today I have yet another Halloween mani for you! Luckily, I snapped pictures of it before I broke off my middle nail, so it looks much better in the photos here than it does right now.
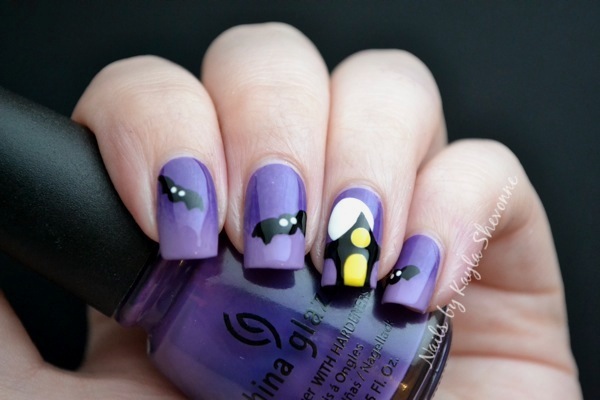
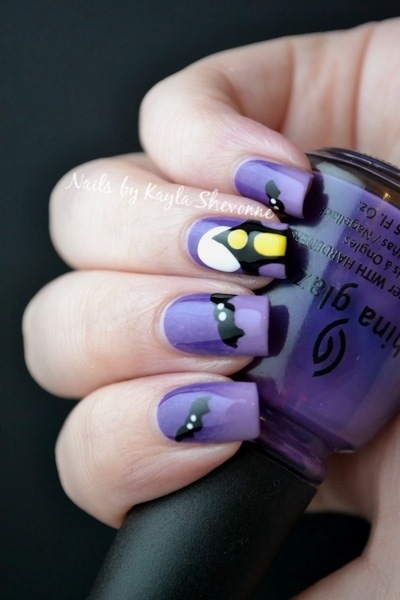
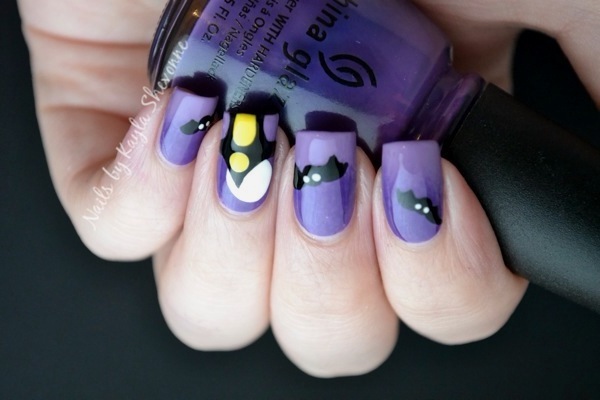
I've been gradienting (definitely not a word, but that's ok) up a storm lately, so this is another design that started out with a gradient as the base. The polishes I used for the gradient are China Glaze Grape Pop and OPI Planks a Lot. To get the gradient as smooth as possible, I used my go-to technique, which can be seen here in a step-by-step tutorial.
Next, I worked on the accent nail by adding the moon with Wet 'n' Wild French White. I drew on the house using Wet 'n' Wild Black Creme and the windows are done using Color Club Almost Famous. And although you can't tell, I also added China Glaze Ghoulish Glow (glow in the dark polish) to the moon and the windows.
Finally, I thought the non accent nails were looking a little plain, so I added some simple little bats.
I saw a design similar to this a while ago, and I used what I remembered of it as loose inspiration for this mani, but I don't remember where it originated from. So if anyone knows, please let me know in the comments so that I can provide proper credit.
Thanks for looking!
I'm so sorry that I haven't been around much lately! I've been really busy with work and for once, I didn't have any older photos lying around that I could use to create some posts while I've been too busy to swatch.
And then to make matters worse, I was going to do some swatching today, that is until I got a bad break on my middle nail last night. Ugh! So this coming week might be scarce in terms of posting as well. I'll try to get back on track as soon as possible though!
Today I have yet another Halloween mani for you! Luckily, I snapped pictures of it before I broke off my middle nail, so it looks much better in the photos here than it does right now.
I've been gradienting (definitely not a word, but that's ok) up a storm lately, so this is another design that started out with a gradient as the base. The polishes I used for the gradient are China Glaze Grape Pop and OPI Planks a Lot. To get the gradient as smooth as possible, I used my go-to technique, which can be seen here in a step-by-step tutorial.
Next, I worked on the accent nail by adding the moon with Wet 'n' Wild French White. I drew on the house using Wet 'n' Wild Black Creme and the windows are done using Color Club Almost Famous. And although you can't tell, I also added China Glaze Ghoulish Glow (glow in the dark polish) to the moon and the windows.
Finally, I thought the non accent nails were looking a little plain, so I added some simple little bats.
I saw a design similar to this a while ago, and I used what I remembered of it as loose inspiration for this mani, but I don't remember where it originated from. So if anyone knows, please let me know in the comments so that I can provide proper credit.
Thanks for looking!
Wednesday, October 17, 2012
Halloween Gradient
Hey guys!
I wasn't planning a post for today, but I remembered that I had this Halloween mani that I wore at the beginning of the month but that I hadn't gotten around to posting yet! So this post will be short because I'm on my way to work, but I still wanted to share this with you.
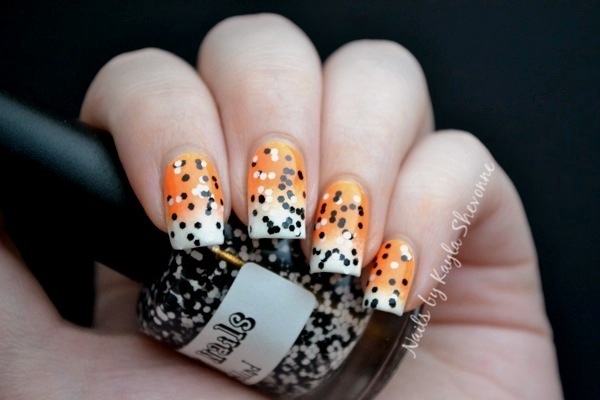
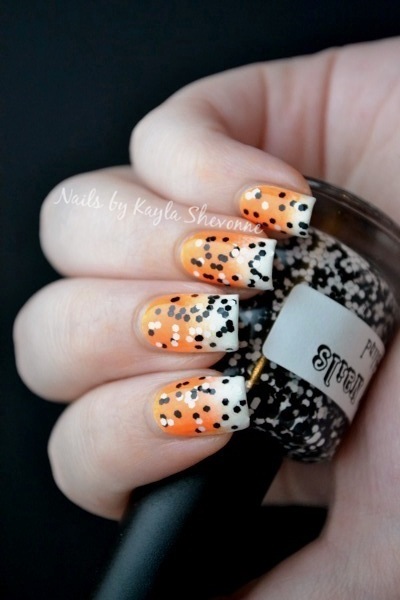
The gradient here is done using Wet 'n' Wild French White and Illamasqua Gamma. I had planned on stopping there and just having a simple Halloween gradient, but I took it one step further by adding a coat of Dandy Nails Colorblind.
To create the gradient, I used the technique that I showed you in a tutorial here. I like this technique a lot and I find it gives me the best and most blended results.
Hope you enjoyed this simple, yet eye-catching Halloween mani! Thanks for looking!
I wasn't planning a post for today, but I remembered that I had this Halloween mani that I wore at the beginning of the month but that I hadn't gotten around to posting yet! So this post will be short because I'm on my way to work, but I still wanted to share this with you.
The gradient here is done using Wet 'n' Wild French White and Illamasqua Gamma. I had planned on stopping there and just having a simple Halloween gradient, but I took it one step further by adding a coat of Dandy Nails Colorblind.
To create the gradient, I used the technique that I showed you in a tutorial here. I like this technique a lot and I find it gives me the best and most blended results.
Hope you enjoyed this simple, yet eye-catching Halloween mani! Thanks for looking!
Monday, October 15, 2012
Halloween Nail Art - Vampire Fangs
Hey everyone!
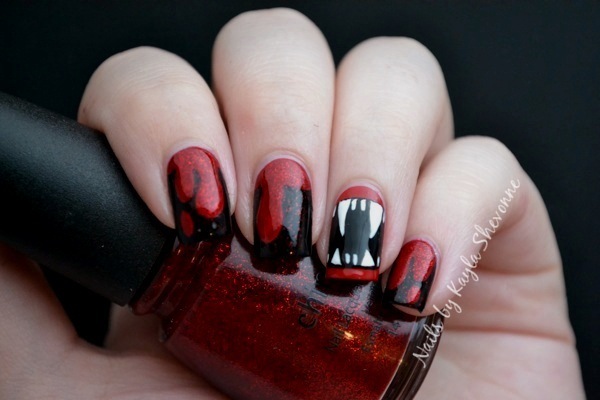
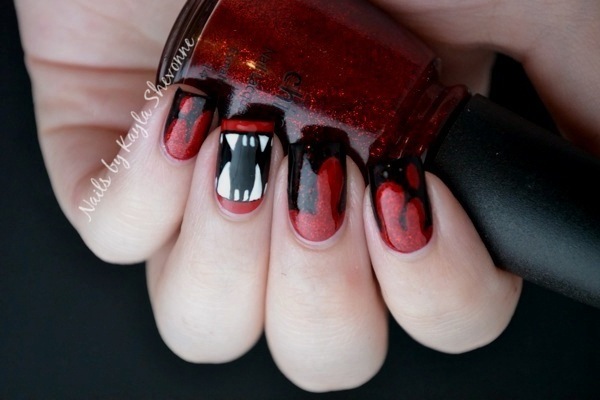
To go along with last year's vampire bite nail art, I thought that it would be appropriate to also do a vampire fang nail design! I've seen this type of design around many times before, so it's nothing new, but it still looks pretty cool.
For the fanged accent nail, I started with a base of Illamasqua Throb and then I filled in the entire midsection with Wet 'n' Wild Black Creme. Lastly, I used a small detail brush and China Glaze White on White to add the fangs.
For the rest of the nails, I started with a base of China Glaze Lubu Heels. I first painted on the drips in white and then filled that in with China Glaze Salsa. Finally, I added some sparkle with China Glaze Ruby Pumps.
I think this design goes really well with my vampire bite design because it's very similar in style - there's one accent nail and then the rest are drippy blood nails. I also used the same colours for the blood in both designs, so that ties everything together as well.
There's still more Halloween designs coming, so keep checking back! Thanks for looking!
Sunday, October 14, 2012
Review & Swatches - OPI Pink of Hearts 2012
Hey guys!
Thank you all once again for the birthday wishes on Friday! I had an awesome day and your comments made it that much more special. :)
I have the OPI Pink of Hearts 2012 Breast Cancer Awareness Duo to show you today! October is Breast Cancer Awareness Month and OPI is once again doing their part by releasing a duo of awareness-raising polishes.
"This duo pack is designed to raise awareness and funds for breast cancer research and support. In 2012, OPI will donate $25,000 in honour of Breast Cancer Awareness Month to Susan G. Komen for the Cure®. OPI will also donate $5,000 to Rethink Breast Cancer in Canada."
Let's take a look!
I Think In Pink is OPI's signature Breast Cancer Awareness shade and it's a soft light pink creme. It's on the sheer side, so it takes three coats to build it up, and even then it's not 100% opaque. I think this would work best used as a sheer colour, perhaps for classic french manicures. The formula was great, and it didn't feel thick even after three coats.
You Glitter Be Good To Me is a clear base with small coppery pink glitters as well as some larger deep pink hex glitters. This can be used as a glitter topper, but it can also be built up on its own with 3 coats. I've shown it both ways below (the first pic is over I Think In Pink, the second pic is YGBGTM on its own).
Personally, I prefer it as a topper, just because I felt that after adding top coat, it was just too thick of a manicure on its own. The formula was really easy to work with and I didn't have to fish any of the larger pink glitters out of the bottle.
The OPI Pink of Hearts 2012 Breast Cancer Awareness Duo is available now at beauty supply stores and in professional salons.
Thank you all once again for the birthday wishes on Friday! I had an awesome day and your comments made it that much more special. :)
I have the OPI Pink of Hearts 2012 Breast Cancer Awareness Duo to show you today! October is Breast Cancer Awareness Month and OPI is once again doing their part by releasing a duo of awareness-raising polishes.
Let's take a look!
I Think In Pink is OPI's signature Breast Cancer Awareness shade and it's a soft light pink creme. It's on the sheer side, so it takes three coats to build it up, and even then it's not 100% opaque. I think this would work best used as a sheer colour, perhaps for classic french manicures. The formula was great, and it didn't feel thick even after three coats.
You Glitter Be Good To Me is a clear base with small coppery pink glitters as well as some larger deep pink hex glitters. This can be used as a glitter topper, but it can also be built up on its own with 3 coats. I've shown it both ways below (the first pic is over I Think In Pink, the second pic is YGBGTM on its own).
Personally, I prefer it as a topper, just because I felt that after adding top coat, it was just too thick of a manicure on its own. The formula was really easy to work with and I didn't have to fish any of the larger pink glitters out of the bottle.
The OPI Pink of Hearts 2012 Breast Cancer Awareness Duo is available now at beauty supply stores and in professional salons.
Friday, October 12, 2012
My 25th Birthday Manicure!
Hey everyone!
As you have gathered from the title of this post, today is my 25th birthday! I'll be out celebrating most of the day, but I just had to show off my birthday mani!
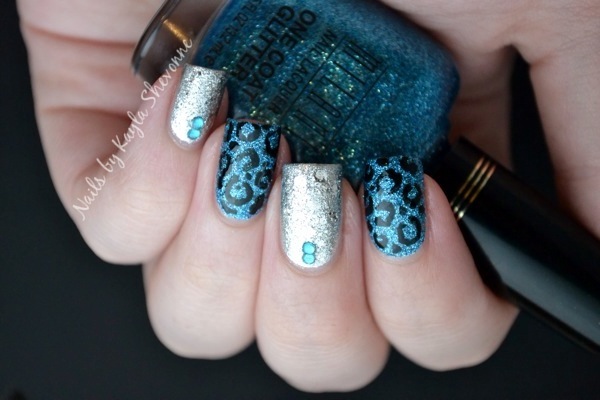
It will come as no surprise that I did animal print for my birthday. Animal print manis are my absolute favourite, so I went with a super glitterly/blingy cheetah and rhinestone mani for this special day.
The cheetah print nails are done using Milani Blue Flash as the base, and then I just freehanded the print using a small detail brush and Wet 'n' Wild Black Creme.
The silver nails started with a base of China Glaze Cheers to You and then I added a coat of OPI Crown Me Already! over top. I was going to stop there, but I thought it needed a little something extra, so I added the blue rhinestones to coordinate with the blue on my other nails.
I could wear glittery animal print on my nails the the rest of my life and totally love every minute of it. This mani screams Kayla Shevonne and I just love it!
Ok I'm off to celebrate! Thanks in advance for the birthday wishes and have a great day everyone!
P.S. The biggest thing I want for my birthday is a happy birthday tweet from Adam Levine. So if you have a spare moment, tweet him () and ask him to send me one. :D I might faint if he actually does it, but it would totally be worth it.
As you have gathered from the title of this post, today is my 25th birthday! I'll be out celebrating most of the day, but I just had to show off my birthday mani!
It will come as no surprise that I did animal print for my birthday. Animal print manis are my absolute favourite, so I went with a super glitterly/blingy cheetah and rhinestone mani for this special day.
The cheetah print nails are done using Milani Blue Flash as the base, and then I just freehanded the print using a small detail brush and Wet 'n' Wild Black Creme.
The silver nails started with a base of China Glaze Cheers to You and then I added a coat of OPI Crown Me Already! over top. I was going to stop there, but I thought it needed a little something extra, so I added the blue rhinestones to coordinate with the blue on my other nails.
I could wear glittery animal print on my nails the the rest of my life and totally love every minute of it. This mani screams Kayla Shevonne and I just love it!
Ok I'm off to celebrate! Thanks in advance for the birthday wishes and have a great day everyone!
P.S. The biggest thing I want for my birthday is a happy birthday tweet from Adam Levine. So if you have a spare moment, tweet him () and ask him to send me one. :D I might faint if he actually does it, but it would totally be worth it.
Thursday, October 11, 2012
Halloween Nail Art - Bloody Brains
Hey guys!
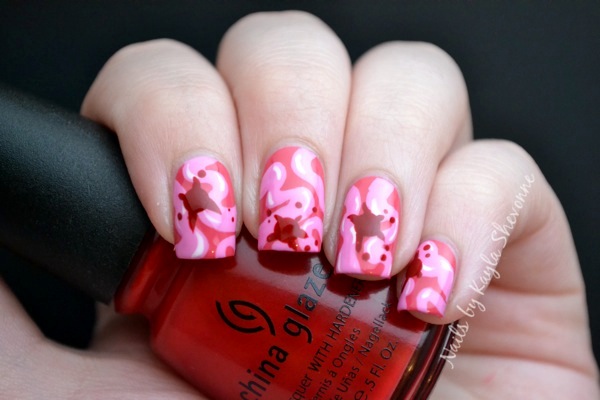
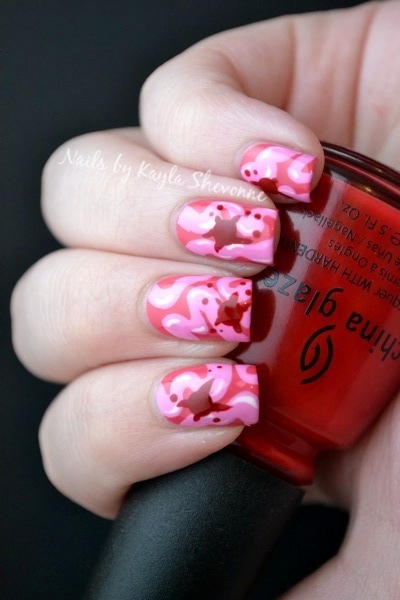
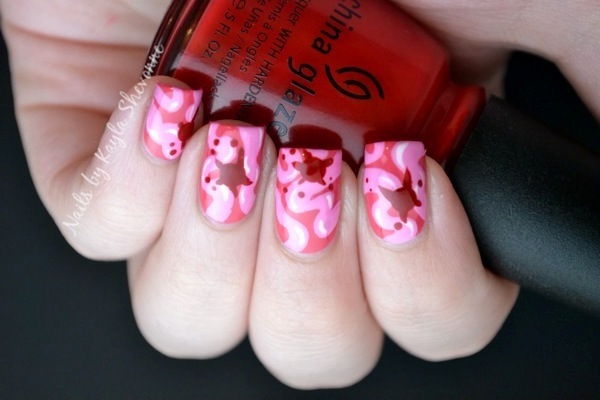
More Halloween nail art for you today! I wanted to do something zombie related, and since I've already done "zombie flesh" nails, I thought that I could try doing some brain nail art. And to take it a step further I decided to make bloody brains!
I think they turned out cool, but the colours came out a little too Valentine's Day-ish for my taste. I think that unless you know what the design is supposed to be, it just looks like an abstract Valentine's Day design.
The base colour I used is OPI Party in My Cabana, which in the bottle looked like the dusty mauve colour that I was going for, but it seemed to turn out much more pink than I had thought.
To create the actual brains, I googled a photo of a cartoon brain and then just sort of mimicked the shapes using a small detail brush and China Glaze Dance Baby, and I highlighted that with strokes of Wet 'n' Wild French White. The blood splatters were done using a mix of Nicole by OPI Deeply in Love and China Glaze Salsa.
I might try this again in more appropriate colours later in the month, as I'd really like to see how it looks with a more creepy/gory look to it.
Tuesday, October 09, 2012
Swatch Spam - Indie Edition
Hi everyone!
I've got a folder full of random swatches waiting to be posted, so I complied a few of those here today in a random indie swatch spam post! Let's get right to it.
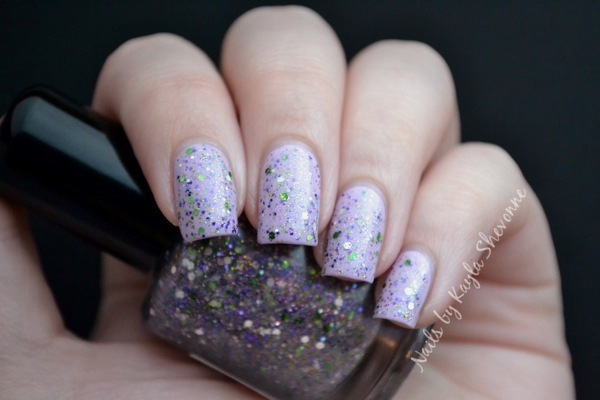
Candeo Colors Mallard is a sheer lilac base loaded with purple shimmer as well as silver, lime and green hex glitter pieces. I've shown it here layered over China Glaze Sweet Hook from the Electropop Collection. The formula was really great and it flowed nicely onto the nails. I love the combination of purple and green, especially in this sort of delicate combination.
CrowsToes Absolum Your Potions Master is an incredible mix of blue, orange, black and green glitters in a clear base. The majority of the glitters are of the hexagonal variety, but there's a few black bar glitter pieces as well. I had a hard time capturing how amazing this polish truly is. The glitters are just so shiny and reflective that my camera sort of freaked out! But trust me, this is a must-have indie in my opinion. The formula was on the thick side, but not difficult to work with. I've shown it here layered over OPI Swimsuit...Nailed It!, which I think created a great combo.
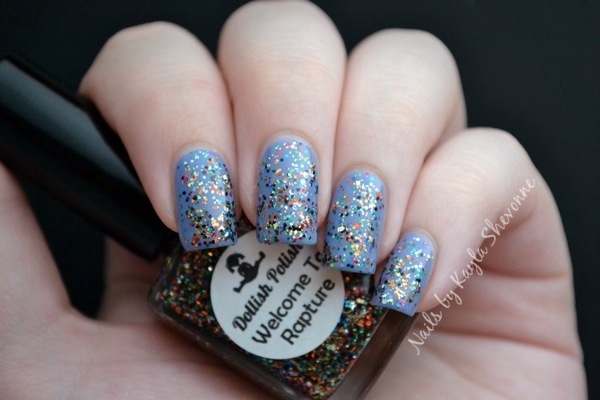
Dollish Polish Welcome to Rapture is a clear base with multi-coloured glitters throughout. I've shown one coat of it layered over China Glaze Peri-wink-le. The formula and application were both great.
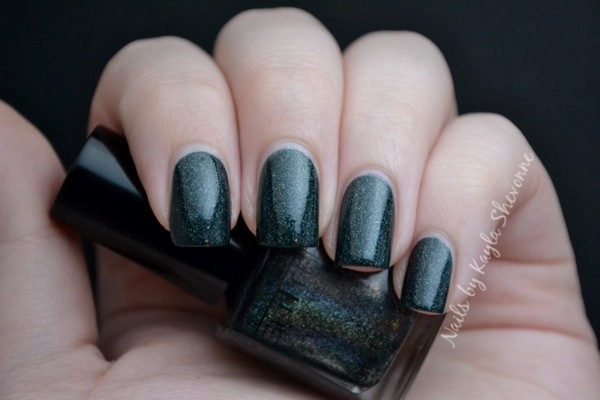
Glitter Gal Lizard Belly isn't really an indie polish (I consider indie to be hand-mixed polishes), but it was just sitting in the folder, so I've included it here regardless. It's a blackened dark green holographic polish and I've shown it both in natural light and using flash to show off the holo finish. The formula was excellent and my swatch is two coats.
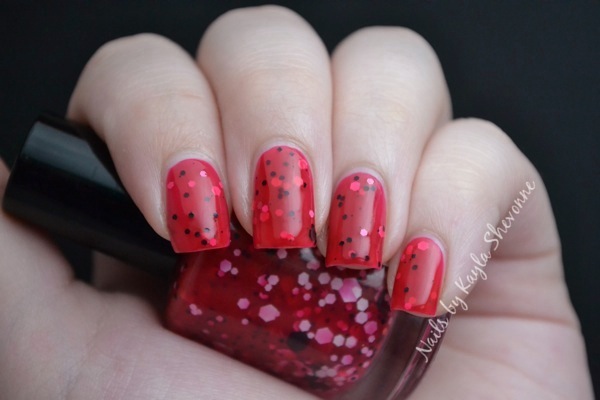
Pretty & Polished Swing is a semi-sheer red jelly polish with black, silver and white hex glitters throughout. This is one of those jelly-sandwich-in-and-of-itself kind of polishes. The formula was easy to work with, although I didn't get any of the larger pieces of glitter; a little fishing with the brush would have done the trick. My swatch shows three coats of Swing on its own.
All of the above brands are available via Llarowe. They range in both price and availability, so be sure to browse the site. Also, you can keep up with for updates and stock information.
I've got a folder full of random swatches waiting to be posted, so I complied a few of those here today in a random indie swatch spam post! Let's get right to it.
Candeo Colors Mallard is a sheer lilac base loaded with purple shimmer as well as silver, lime and green hex glitter pieces. I've shown it here layered over China Glaze Sweet Hook from the Electropop Collection. The formula was really great and it flowed nicely onto the nails. I love the combination of purple and green, especially in this sort of delicate combination.
CrowsToes Absolum Your Potions Master is an incredible mix of blue, orange, black and green glitters in a clear base. The majority of the glitters are of the hexagonal variety, but there's a few black bar glitter pieces as well. I had a hard time capturing how amazing this polish truly is. The glitters are just so shiny and reflective that my camera sort of freaked out! But trust me, this is a must-have indie in my opinion. The formula was on the thick side, but not difficult to work with. I've shown it here layered over OPI Swimsuit...Nailed It!, which I think created a great combo.
Dollish Polish Welcome to Rapture is a clear base with multi-coloured glitters throughout. I've shown one coat of it layered over China Glaze Peri-wink-le. The formula and application were both great.
Glitter Gal Lizard Belly isn't really an indie polish (I consider indie to be hand-mixed polishes), but it was just sitting in the folder, so I've included it here regardless. It's a blackened dark green holographic polish and I've shown it both in natural light and using flash to show off the holo finish. The formula was excellent and my swatch is two coats.
Pretty & Polished Swing is a semi-sheer red jelly polish with black, silver and white hex glitters throughout. This is one of those jelly-sandwich-in-and-of-itself kind of polishes. The formula was easy to work with, although I didn't get any of the larger pieces of glitter; a little fishing with the brush would have done the trick. My swatch shows three coats of Swing on its own.
All of the above brands are available via Llarowe. They range in both price and availability, so be sure to browse the site. Also, you can keep up with for updates and stock information.
The product(s) in this post were provided by the above retailer in exchange for an honest review.
Monday, October 08, 2012
Halloween Nail Art - Stamped Spiderwebs
Hey guys!
I meant to post this yesterday, but I had a busy day celebrating Thanksgiving and just couldn't find the time. Happy Thanksgiving to my fellow Canadians!
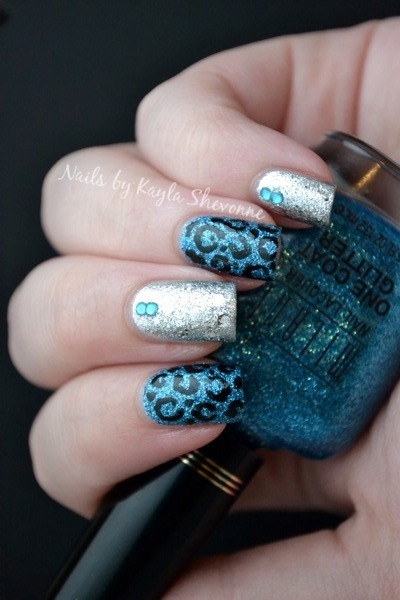
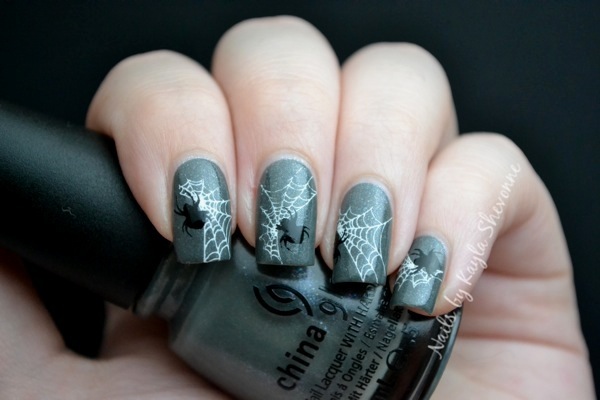
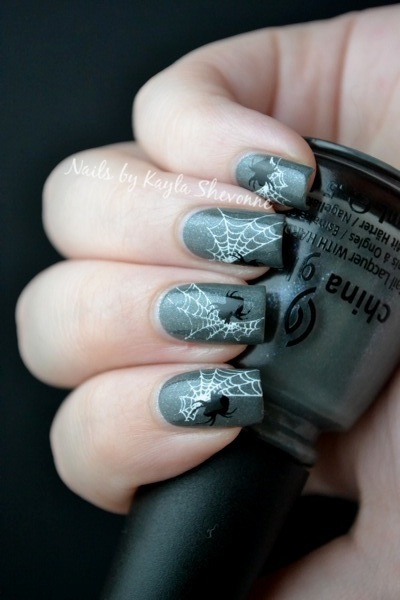
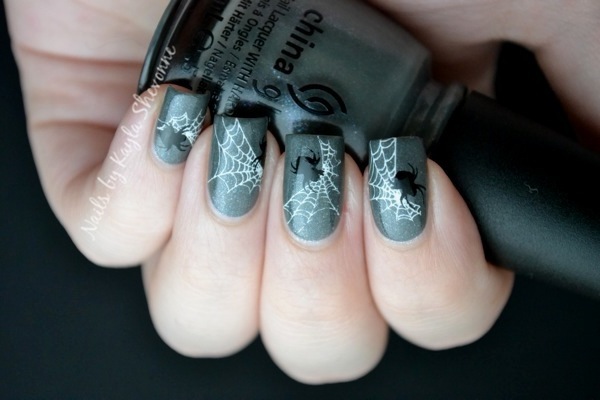
Today's nail art is a simple stamping design that I whipped up just to have something on my nails yesterday. But I did end up liking it more than I anticipated!
The base here is China Glaze Immortal from the new Wicked Collection, and the stamping is done using designs from plate BM-13. I used Konad Special Polishes in Black and White for the stamping.
I was considering mattifying this design but never did get around to it. What do you guys think? Would it be better if it were matte?
I'm working on a few more Halloween designs, so be sure to check back to see what I come up with! In the meantime, you can see step-by-step tutorials for several of my previous Halloween designs by going to the tutorials tab at the top of the page. :)
I meant to post this yesterday, but I had a busy day celebrating Thanksgiving and just couldn't find the time. Happy Thanksgiving to my fellow Canadians!
Today's nail art is a simple stamping design that I whipped up just to have something on my nails yesterday. But I did end up liking it more than I anticipated!
The base here is China Glaze Immortal from the new Wicked Collection, and the stamping is done using designs from plate BM-13. I used Konad Special Polishes in Black and White for the stamping.
I was considering mattifying this design but never did get around to it. What do you guys think? Would it be better if it were matte?
I'm working on a few more Halloween designs, so be sure to check back to see what I come up with! In the meantime, you can see step-by-step tutorials for several of my previous Halloween designs by going to the tutorials tab at the top of the page. :)
Saturday, October 06, 2012
Review & Swatches - China Glaze Wicked Collection
Hi everyone!
How has everyone been over these past few days? I felt kind of worn out after completing the 31 Day Challenge, so I took a few more days off than I had intended to. I caught up on some reading, watched some shows that I had recorded on the DVR and did some much needed housework.
But now it's time to jump right back into the swing of things and I'll be starting that by showing you the new Halloween collection by China Glaze!
Keep reading for swatches and the full review!
Read more »
Monday, October 01, 2012
31 Day Challenge - Day 31: Recreate a Manicure You Love
Hey guys!
Can you believe that we're at the end of the challenge? It went by so fast!
The prompt today is to recreate a manicure you love, which can be interpreted in many different ways. Do I recreate one of my own favourite designs? Someone else's? Someone else's who also participated in the challenge? Just any random manicure that I love?
For me, I chose to share the love and recreate a mani by someone else who's also been doing the challenge this month - my good friend Rebecca of Rebecca Likes Nails. She's done some really amazing designs during this challenge, so I had plenty to choose from.
I was originally set on recreating her day 9 rainbow design, that is until she posted her day 27 inspired by art design! She used Andy Warhol (in particular, the NARS Andy Warhol makeup collection) as her inspiration, and her mani was so cool!
I think that day 27 really turned out to be my favourite day of the whole challenge. Not just because I loved my own design that day, but I really loved everyone else's as well. I saw many amazing designs in my reader that day, including this one by Rebecca, of course.
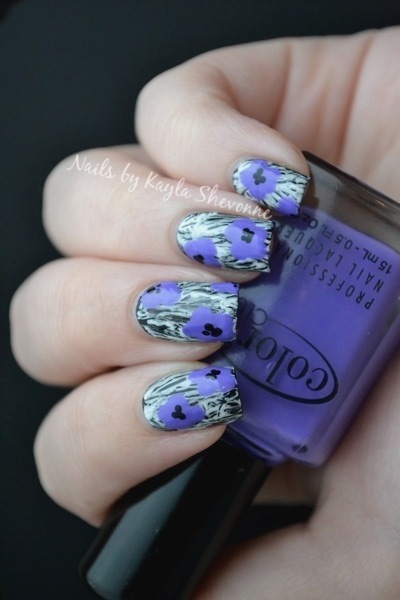
I don't own the same black and white that Rebecca used, but that was no biggie since all black and white cremes look basically the same. I do own the same purple though (Color Club Pucc-licious), so I was able to easily replicate the colouring of her mani.
I really love how this turned out! And it's deceptively easy to do!
Well that ends the 31 day challenge! Thank you to everyone who checked back every single day to see my designs - you provided me with the motivation to complete every mani. :)
I think I'll take a day or two off from posting just to regroup and do some swatching that I've been putting off during the challenge. But I'll be back in a couple of days and then I'll be starting my Halloween nail art designs!
Can you believe that we're at the end of the challenge? It went by so fast!
The prompt today is to recreate a manicure you love, which can be interpreted in many different ways. Do I recreate one of my own favourite designs? Someone else's? Someone else's who also participated in the challenge? Just any random manicure that I love?
For me, I chose to share the love and recreate a mani by someone else who's also been doing the challenge this month - my good friend Rebecca of Rebecca Likes Nails. She's done some really amazing designs during this challenge, so I had plenty to choose from.
I was originally set on recreating her day 9 rainbow design, that is until she posted her day 27 inspired by art design! She used Andy Warhol (in particular, the NARS Andy Warhol makeup collection) as her inspiration, and her mani was so cool!
I think that day 27 really turned out to be my favourite day of the whole challenge. Not just because I loved my own design that day, but I really loved everyone else's as well. I saw many amazing designs in my reader that day, including this one by Rebecca, of course.
I don't own the same black and white that Rebecca used, but that was no biggie since all black and white cremes look basically the same. I do own the same purple though (Color Club Pucc-licious), so I was able to easily replicate the colouring of her mani.
I really love how this turned out! And it's deceptively easy to do!
Well that ends the 31 day challenge! Thank you to everyone who checked back every single day to see my designs - you provided me with the motivation to complete every mani. :)
I think I'll take a day or two off from posting just to regroup and do some swatching that I've been putting off during the challenge. But I'll be back in a couple of days and then I'll be starting my Halloween nail art designs!