Monday, April 30, 2012

Pirate Triangles Nail Art

Hey guys!

Okay, so there aren't any actual pirates in this mani, but I did use several polishes from OPI's Pirates of the Caribbean Collection from last year - hence the title. I still think that this is one of the better collections that OPI has released in a while and I wanted to revisit some of the colours.

For this design, I started with a base of white (although now I sort of wish that I had used OPI Skull & Glossbones instead) and then using a striping brush, I drew some simple triangles using OPI Mermaid's Tears, Planks A Lot and Sparrow Me The Drama.


I think the end result is ok, but it might be missing a little something. Maybe I should mattify the whole look? What do you guys think?


Products used:
CND Stickey Base Coat
China Glaze - White on White
OPI - Mermaid's Tears
OPI - Planks A Lot
OPI - Sparrow Me The Drama
Seche Vite Top Coat

Sunday, April 29, 2012

Haul - Color Club, China Glaze & Nail-Venturous

Hey guys!

Sorry that I've been slacking on posts lately. Unfortunately, our little hedgehog Pepper is sick and we've been focusing a lot of attention on him. I apologize in advance if posting becomes sporadic because of this.

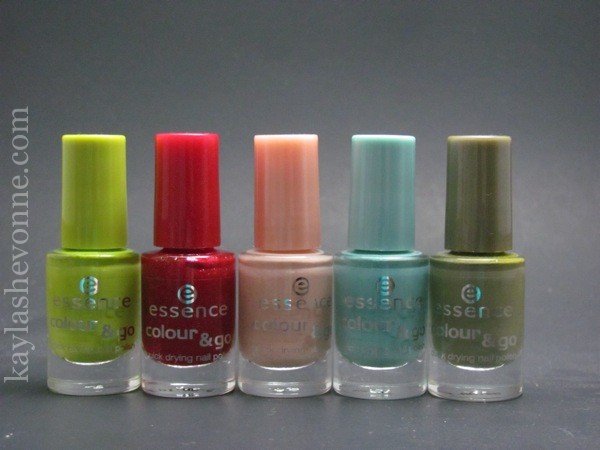
Today's post is a haul that includes polishes I've acquired over the last few weeks. I haven't been doing many hauls lately because I really haven't been buying that much. But the polishes I'm going to show you today are all ones I've been wanting for a while.

Warning: I had to take these photos with my phone, so they're not the best quality.

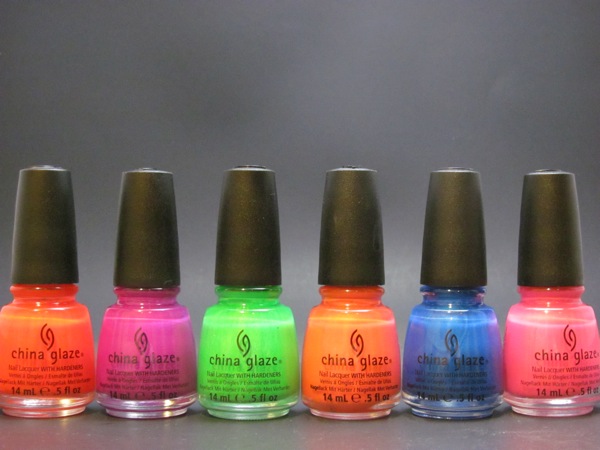
China Glaze Summer Neons Collection: Love's a Beach, Ride the Waves, Orange You Hot?, Under the Boardwalk, Sun-Kissed, Pink Plumeria

China Glaze Summer Neons Collection: Surfin' For Boys, Beach Cruise-r, I'm With the Lifeguard, Flirty Tankini, Splish Splash, Hang-ten Toes

You all know how I love neon polishes so there was just no way I was going to pass up an entire 12 piece neon collection! A lot of these have a subtle shimmer to them that is really pretty and makes them a little more unique than your average neon shades.

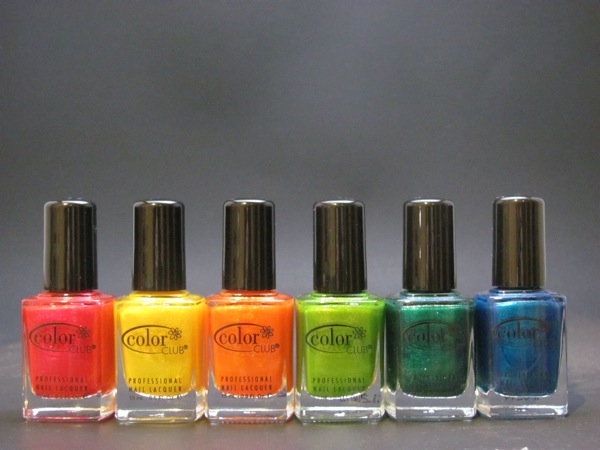
Color Club Take Wing Collection: Wing Fling, Daisy Does It, Sparkle and Soar, Fly With Me, Metamorphosis, Sky High

I've been excited about this collection since I first saw the promo pics and it recently started showing up at Winners stores in my area. Sadly, they're only available in packs of 2 for $8. That's much more expensive than the usual $13.99 for entire 6-7 piece collections. So, the first time I saw them, I exercised some level of willpower and didn't get any. However, I was at Winners Friday evening and I just couldn't pass on them again, so they all came home with me.

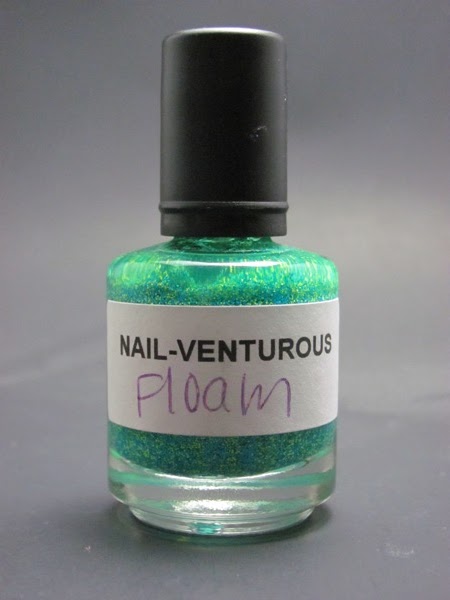
Nail-Venturous: Floam

I've actually had this gem for a number of weeks but I haven't tried it yet, so I figured it still qualified to be included in this haul post. My bottle of Floam actually came straight from Amy herself, which is why I have a different label than the store-bought ones! I know you've seen endless swatches of this, but I'll be showing it to you again in an upcoming post. I mean, it's not like you can ever get sick of Floam anyways!

Ok, I'm going to go back to my low-buy now, I swear.

Thursday, April 26, 2012

Tape Mani Thursday - Chic Coral Stripes

Good morning!

Today is another special blogger/nail polish enthusiast collaboration! Last week we did Marble Monday and this week we're all doing tape designs for Tape Mani Thursday! Check out the Inlinkz collection at the end of this post to see all of the other awesome submissions for Tape Mani Thursday.

Now, I don't normally like to work with tape, simply because I'm impatient and hate waiting for my polish to dry completely before using the tape. I like to start painting my nails and never really stop until I add my top coat. I guess that habit comes from professional experience though, since we were told by our instructors to always be working when doing a client's nails.

Admittedly though, I wasn't feeling overly inspired for this week's theme. So, I decided to recreate this great mani that I saw a long time ago over at Lacquerized. I don't own the Eyeko polish that she used but I found a suitable substitute from the new China Glaze Summer Neons Collection called Surfin' For Boys.


For this design, I started with a base of white, and after allowing it to dry for about an hour, I then used thin pieces of scotch tape to tape off a different sections on each of my nails. I filled in those sections with China Glaze Surfin' For Boys and quickly removed the tape. Then, within the remaining white sections, I freehanded some black stripes.

My original intention was to use thin striping tape to create my black stripes, but even those turned out to be too thick and I wasn't able to fit as many into the sections as I wanted.


I love how this turned out and I'm totally digging this new neon collection by China Glaze! Many of the shades have a subtle shimmer to them that I really like.


Products used:
CND Stickey Base Coat
China Glaze - White on White
China Glaze - Surfin' For Boys
Wet 'n' Wild - Black Creme
Seche Vite Top Coat


Tuesday, April 24, 2012

Tutorial - Neon Geometric Nail Art

Good morning!

Today I have a tutorial for you! This one is for my recent neon geometric design and my next tutorial will be for yesterday's neon drippy manicure.

The good thing about this design is that it's very versatile! So if you're not a fan of neons, you can still follow this tutorial, but just replace the colours I've used with any of your choice. Try a monotone look by using only shades from one colour family, or lighten it up by using pastels with white stripes instead of black!

Let's get to the tutorial! To refresh, here's the design I'll be showing you how do do:


Monday, April 23, 2012

Neon Drips Nail Art

Hey guys!

I seem to be on quite the neon polish kick lately! When I sat down to paint my nails last night, I had a simple drippy design in mind, but I hadn't decided on the colours. I found myself drawn to neon shades once again, so I picked two and got to work!

I started with a base of white and then freehanded on some drippy designs using China Glaze Flip Flop Fantasy and Turned Up Turquoise. The drippy manicure is super simple, so even those who don't feel comfortable with freehand nail art can easily do this design!

Enjoy!


Products used:
CND Stickey Base Coat
China Glaze - White on White
China Glaze - Flip Flop Fantasy
China Glaze - Turned Up Turquoise
Seche Vite Top Coat

P.S. I added a few new items to my Etsy shop last night! The three new designs include this white tiger stripe design, this recent neon geometric design and most excitedly, my peacock feathers design which several of you have asked me if I was going to be carrying.

Friday, April 20, 2012

Neon Geometric Nail Art

Hey guys!

Have I ever mentioned how much I love neon polishes? Because I really, really love neon polishes! They generally don't look as good against my skin colour (pasty white) as they would against a more tanned complexion, but frankly, I don't care! I love neons so I'm going to wear them regardless!

So today I decided to do a geometric pattern using a few neon shades from both China Glaze and Colour Club (the two brands who do neons best, in my opinion). And China Glaze is coming out with a 12 piece neon summer collection soon so that's definitely going to be hard for me to resist!

I can't take credit for this design though because I saw it on tumblr a while ago. Sadly, I didn't save the photo or bookmark the page so if anyone knows who I should credit for this design, please let me know.

Enjoy!


Products used:
CND Stickey Base Coat
China Glaze - White on White (base)
China Glaze - Sun Worshipper (orange)
China Glaze - Shocking Pink (lighter pink)
China Glaze - Celtic Sun (yellow)
Color Club - Chelsea Girl (blue)
Color Club - Warhol (darker pink)
OPI - Black Onyx (black stripes)
Seche Vite Top Coat

Thursday, April 19, 2012

Blogging 101 - How To Start and/or Grow Your Nail Polish Blog

Hey guys!

Today's post is something a little different. I frequently receive emails asking for advice on how to become a successful blogger. When I first starting getting these, I was a little confused - I guess because I had never considered myself "successful". But, I suppose my little blog has become rather successful in the almost 2 years that I've been blogging! 

So today I'm going to be discussing tips and tricks for starting and growing your polish blog. Keep in mind, following these guidelines will not make you an overnight blogging sensation, but they will keep people coming back to your site.

Warning: This is going to be a very long and very wordy post! I put a lot of time into it though because I definitely think that some will find it useful.

Sweet as Candy, Choose Me!, Where Is The Party?, Wanna Be Your Sunshine, Nude It!


Lime Up!, Glamorous Life, Modern Romance, You Belong To Me, High Spirits


Luxury Secret, Let's Get Lost, Wake Up!, Walk Of Fame, Walk On Air


All 15 of these polishes came to only $25.26, tax included. How awesome is that?!

You'll definitely be seeing swatches of some, if not all of these Essence polishes at some point. But first I have to get my hands on the last 5!

And if any of you Canadian girls want some more info on the Essence launch, check out this very in-depth post by my friend Rebecca over at Rebecca Likes Nails.

Monday, April 16, 2012

Marble Monday - Peacock Inspired Marble

Hey guys!

If you've been looking through your reader, you must have already seen the large number of water marbles that have been posted today. Many of us decided to participate in a Marble Monday where we all try our hands at water marbling and link to each other! I probably wouldn't have agreed to participate if it wasn't for my recent success with water marbling.

So was I successful again?


I was!

For this marble, I used my new blog design as inspiration. First, I picked out three colours that match the peacock feathers (China Glaze Grape Pop, Zoya Robyn and China Glaze Custom Kicks) and then I did my marble. But when I was done, I thought it was missing something. So, I added some white dots to tie in the white from my blog as well, and I think that really completed the look.

Sadly, I had a really rough time photographing this. The blue was showing up as brighter than it truly is, and the teal was showing up duller than it truly is. After taking over 100 photos, I settled on these three, but I'm still not totally satisfied. You'll just have to trust me that this is even better in person!


Regardless of my photography problems, I really, really like how this turned out - especially my ring finger!

At the bottom of this post is a collection of photos that links to the other marbles that have been done today, so be sure to check them out!

Products used:
CND Stickey Base Coat
China Glaze - White on White (base, dots)
China Glaze - Grape Pop
Zoya - Robyn
China Glaze - Custom Kicks
Seche Vite Top Coat


Sunday, April 15, 2012

piCture pOlish - Peacock

Hey guys!

The Jerry Seinfeld show was awesome! David and I had a lot of fun and I'm so glad we went! It was definitely a once in a lifetime opportunity.

Today I'll be showing you the last shade from the piCture pOlish Opulence range. This one is called Peacock and you can imagine that I saved the best for last! I might be a little biased towards this shade though, considering the design of my blog and all. But even if I'm biased, there's no denying that this is an awesome shade!

Peacock has a sheer purple jelly base and its packed with blue and green glitter.


The formula was a little thick, but it wasn't hard to work with. My swatch is 3 coats, but you could get away with only 1 or 2 if you layered this over another polish. Also, I recommend a layer of top coat for sure because this looks a little dull (more so in person than in photos) without it.


Peacock retails for $13.50 USD and can be purchased here on piCture pOlish's website.

That's it for the piCture pOlish Opulence Range of polishes! What did you guys think? Any that stand out to you?

Friday, April 13, 2012

Double Animal Print & Colour Blocking Nail Art

Hey guys!

Today is a really exciting one because tonight I'm going to see Jerry Seinfeld! He's currently doing a comedy tour and surprisingly, he's coming here to Newfoundland! (We don't get many really big stars around these parts.) David and I managed to get tickets before they sold out (which meant we were refreshing the ticket page over and over the day they went on sale, haha).

I'm really excited about this and I knew I wanted to do something fun on my nails for this event. I had a few ideas running through my head, but in the end I landed on animal print (surprise, surprise). I did put a little twist on it to make it more original, though!

Hope you like it!


Products used:
CND Stickey Base Coat
OPI - Fly (base, colour blocking on ring nail)
OPI - Kiss Me On My Tulips (base on ring nail, colour blocking on rest of nails)
China Glaze - White on White (zebra stripes)
Seche Vite Top Coat

Thursday, April 12, 2012

piCture pOlish - Mask-A-Rade

Hey guys!

Today I have another shade from the piCture pOlish Opulence Range to show you! This one is called Mask-A-Rade and it's a clear base with what seems like every possible colour of multi-chromatic glitter mixed in.

Most swatches of Mask-A-Rade have shown it layered over a black creme, so I decided to try something different and layer it over a dark purple - specifically, OPI Ink. I do think that I prefer it over black, though.

Regardless of that, this polish is pretty cool. All of the glitter pieces shift colours when you move your hand/nails, which makes for a really interesting effect.


Mask-A-Rade is definitely a layering polish since it would probably take 4-5 coats to be opaque on its own. I think that the glitters stand out better layered over an opaque base, anyways.

My swatch is 1 coat over OPI Ink, but I wish I had added another coat or 2 for more sparkle. In fact, I think I might re-swatch this sometime soon using 2-3 coats over a black creme. I think I'll also add a layer of top coat since I think that will bring out the sparkle even more.


Mask-A-Rade retails for $13.50 USD and can be purchased here on piCture pOlish's website.

Stay tuned for the last shade from the piCture pOlish Opulence Range!

Wednesday, April 11, 2012

Tropical Water Marble

Good morning!

Today I have something a rather exciting manicure for you - it's my first truly successful water marble! I've tried water marbling a few times before but it never really worked. In fact, the one time that it did work, I had to re-do the majority of my nails at least once before they were satisfactory. However, this time there were no problems and I didn't have to re-do any of my nails!

I had chosen a few shades from the recent China Glaze Electropop Collection to use in my marble but I also wanted to use an orange shade - which the Electropop Collection didn't offer. So, I used four shades from that collection and then an orange shade by Zoya.

Interestingly, a couple of the shades changed a little throughout the process! China Glaze Aquadelic, for example, is an aqua shade in the For Audrey family, but it changed to more of a green shade. As well, China Glaze Fuchsia Fanatic is a fuchsia/berry shade that changed into a sort of deep orange colour when mixed with the others. Very cool!


The end result turned out looking rather tropical and it reminds me of something rather strange that I'm sure many of you won't even understand.

I'm not really into video games but I do love one in particular - it's called Viva Pinata and it's a simulation game where the player is tasked with turning a plot of land into a beautiful garden that attracts many different species of "pinatas". It's ridiculously fun, albeit maybe a little childish. Well, this water marble totally reminds me of one of the pinatas in the game called "Fourheads". Here's a picture for reference:


It's so similar, right?!


Anyways, I hope you enjoyed my first successful water marble! I'm definitely going to be doing more of these in the future.

Products used:
CND Stickey Base Coat
China Glaze - Sunshine Pop
China Glaze - Aquadelic
China Glaze - Fuchsia Fanatic
China Glaze - Gaga for Green
Zoya - Jancyn
Seche Vite Top Coat

Tuesday, April 10, 2012

piCture pOlish - Monroe

Hey guys!

Today I have one of the three new shades from piCture pOlish's Opulence Range of polishes to show you! The girls at piCture pOlish were kind enough to send me all three of the Opulence shades so you'll be seeing the others throughout the week.

The one I'll be showing you today is called Monroe and not that it even needs to be said, but the inspiration for this polish is obviously Marilyn Monroe. As the bottle itself describes, she's a "classic Hollywood icon".

Monroe is a deep, blood red jelly polish with tiny specks of holographic glitter speckled throughout. The speckles are very small so they're not too visible from far away but they really add that extra sparkle up close. Plus, the deep red colour is really gorgeous so even from far away, this polish still looks great.

As a fair warning, red polishes tend to wash my skin out in photos. The colour of the polish is accurate, though.


The formula is great and I didn't experience any dragging or bald spots, which can happen with some jelly polishes. My swatch shows two coats of Monroe, but you could add another to make it even deeper looking if you'd like.

I don't normally gravitate towards red shades but this is definitely one that I see myself wearing.


Monroe retails for $13.50 USD and can be purchased here on piCture pOlish's website.

Stay tuned for the other two shades from the Opulence Range!

Monday, April 09, 2012

My Nail Polish Storage/Setup!

Good afternoon!

I managed to complete my reorganization project over the weekend, so as promised, I've taken some photos of my updated setup!

Some of you might remember my original setup from when I moved a few months ago, but I was weary of having my melmers stacked three high, just because they're so heavy with all of the nail polish in them. So, I wanted to take them down to stacks of two, but still have everything look clean and organized.

On top of that, Michael's recently had a pretty good sale on their storage units, so although I didn't actually need to expand, I decided to pick up two more melmer units for future expansion. That meant that altogether, I would have eight melmers and thus need space for four stacks of two. In order to fit all of those together, I had to do some reorganizing of my entire polish room, and I'm really happy with the way everything came together!


I hope you guys enjoyed seeing my polish space!

How do you store your polish?

Saturday, April 07, 2012

China Glaze - Riveting

Hey guys!

Today I have my absolute top pick from the recent China Glaze Colors from the Capitol Collection (a.k.a The Hunger Games Collection). I got all 12 shades from this collection, not even because I liked them all, but simply because I love the books so much that I know I would regret it in the future if I was missing any of the colours.

Before even seeing swatches, I had pegged a few of the shades as being contenders for my favourites, and this was never one of them. But after trying it out for myself, I'm blown away by this polish.

Riveting is an electrifying, fiery orange with intense gold shimmer and a glass fleck finish (which China Glaze always does well). The formula is freaking amazing and it's almost a one-coater, although I used two for good measure.


Riveting is supposedly inspired by District 3, which is the technology district of Panem. However, if anyone else is a fan of the books, then you will most likely agree with me when I say that the original names of the polishes (the ones released before the controversy and subsequent lawsuit - google the whole story if you're not familiar with it) were much better than the names that were actually produced.

Originally, Riveting was named Fire in Flight and it was inspired by the flaming mockingjay.

Here's a photo of the polishes and what their original names were meant to be:

  • Candeo Colors - Sprouse
  • Labels


    Archive