Monday, July 29, 2013

piCture pOlish Blog Fest 2013 - Nebula Nail Art (+ Tutorial)

Hey everyone!

I'm sure your feed is certainly being bombarded with posts from piCture pOlish Blog Fest 2013 today, and this is my contribution! I've participated in Blog Fest since the beginning, so this is my third year and it's definitely become something that I look forward to each year.

This year piCture pOlish decided to celebrate bloggers by giving Blog Fest 2013 the theme "Year of the Blogger"! So we were all tasked with using three piCture pOlish shades to create an awesome nail art design and corresponding tutorial.


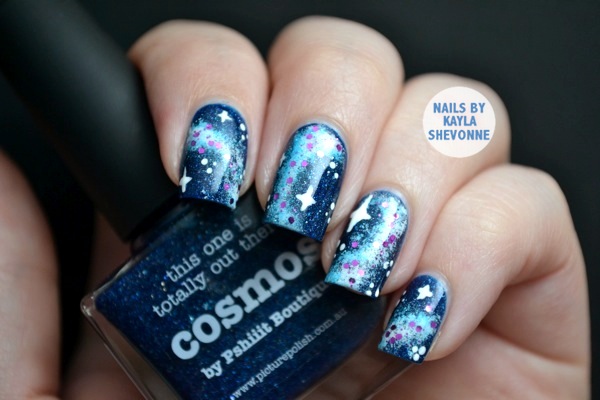
The three shades that the piCture pOlish gals chose for me are Cosmos, Ocean and Gene Doll. Before the polishes even arrived I had a pretty good idea of what I wanted to do with them - a nebula/galaxy design.


To achieve this look, I started with a (very fitting) base of piCture pOlish Cosmos. Cosmos is one of the piCture Polish Collaboration polishes and this one was created in collaboration with Pshiit Boutique. It's a beautiful, deep intense blue jelly with a scattered holographic effect and those wonderful micro-flakes that piCture pOlish is famous for.

When my base of Cosmos was completely dry, I used a piece of torn off makeup sponge and I stippled on some white polish to create the basic shape of the nebulas. Next, I used piCture pOlish Ocean to sponge over some of the white, particularly around the edges. Ocean is another Collaboration polish, this one was created in collaboration with Kelly's Kolors. It's a bright turquoise blue jelly with the same holographic effect and micro-flakes as Cosmos.

I then applied some of piCture pOlish Gene Doll only to the inside of the nebulas. Gene Doll consists of hexagonal fuchsia glitter in a clear base. I didn't get quite enough glitter with the first coat so I went back with the small end of a dotting tool and placed just a few individual glitters.

I went back with my white and added a few stars to really complete the galaxy look. A quick coat of top coat finished everything off!


Now if you want to really see how this was done, from start to finish, I've also created a full video tutorial to go along with this design! Check it out below.


If the embedded video doesn't work for you, . And while you're there, go ahead and ! I'm starting to get the hang of these video tutorials, so it's definitely something I want to continue doing.


piCture pOlish will be posting all of the Blog Fest manis to and from there, three Blog Fest awards will be chosen! One by you, the fans, one by us, the bloggers, and one by the piCture pOlish gals. The winners will be given an opportunity to work with piCture pOlish to create their very own piCture pOlish Collaboration polish in 2014!


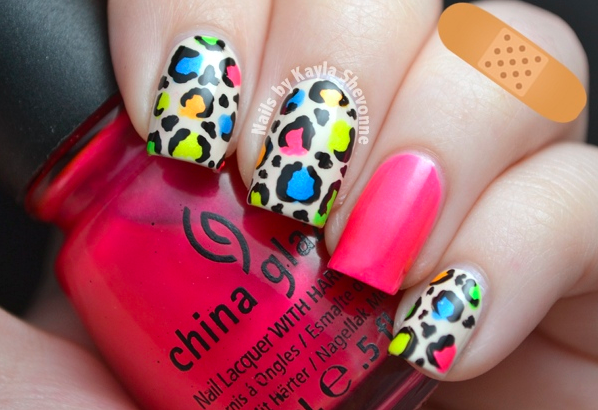
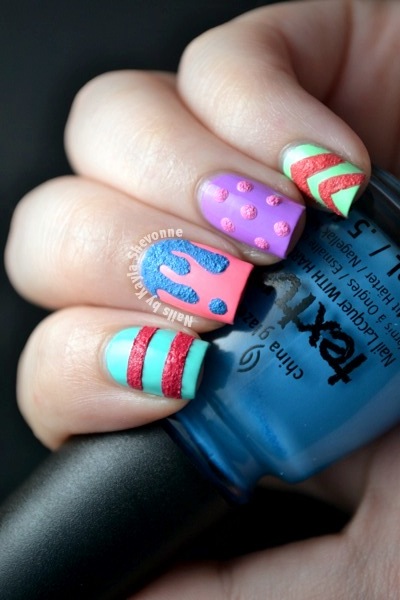
I started out with OPI My Vampire is Buff (big surprise) as the base for most of my nails. On my accent nails I used China Glaze Love's a Beach. For the leopard spots, I also used Love's a Beach as well as a few other colours from the China Glaze Summer Neons Collection, which by the way is definitely my favourite collection released by China Glaze (and possibly every other brand) in the last 3 years.

The shades include Splish Splash, I'm With the Lifeguard, Orange You Hot? and Sun-Kissed. Finally, I outlined the spots using China Glaze Liquid Leather and a small nail art brush. A coat of Seche Vite finished everything off.


Oh and I'm sure you're all wondering what that band-aid is doing in all of my photos. Well I had a little accident with my curling iron yesterday and the little burn mark doesn't look very pretty, so I decided to cover it up with a cute band-aid image. I could have just put an actual band-aid on the burn, but I think this looks way cuter. Maybe if I had some cool printed band-aids, but all I have are the boring regular ones.


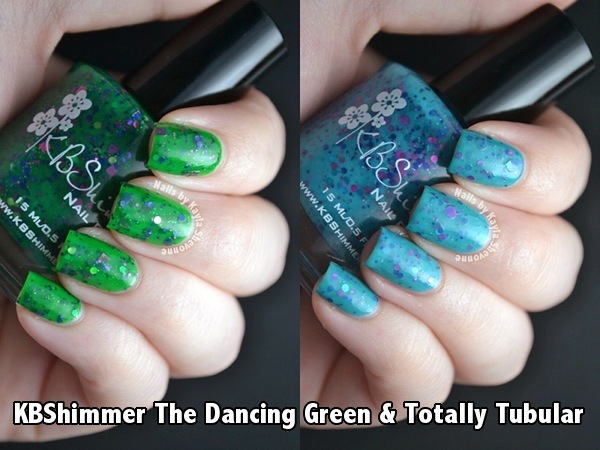
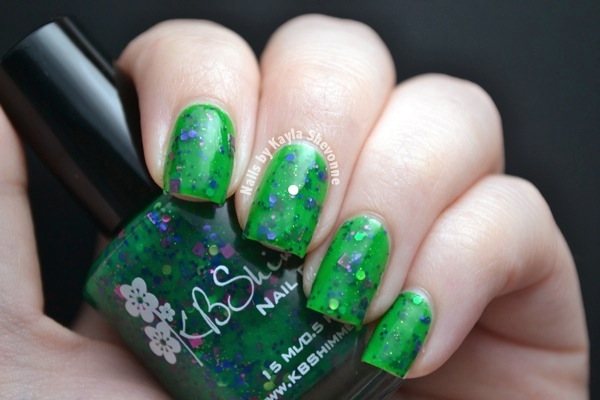
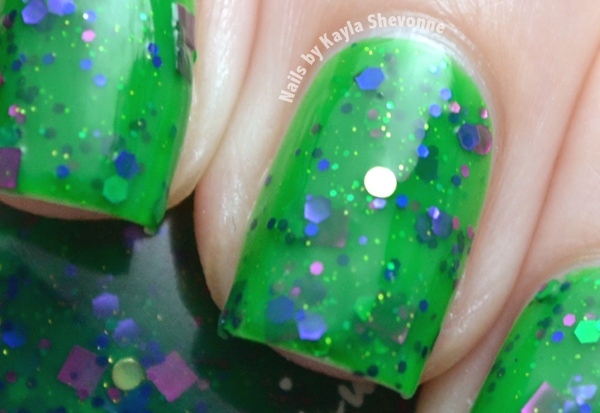
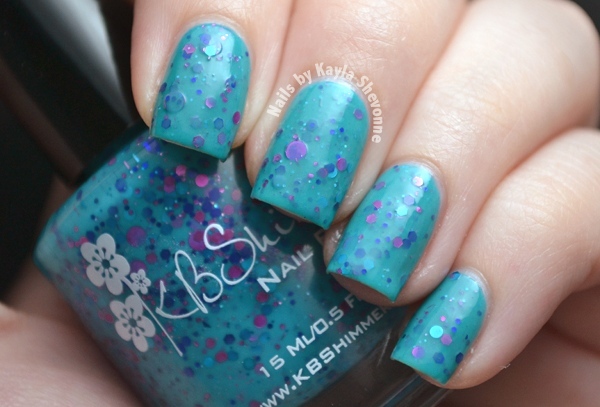
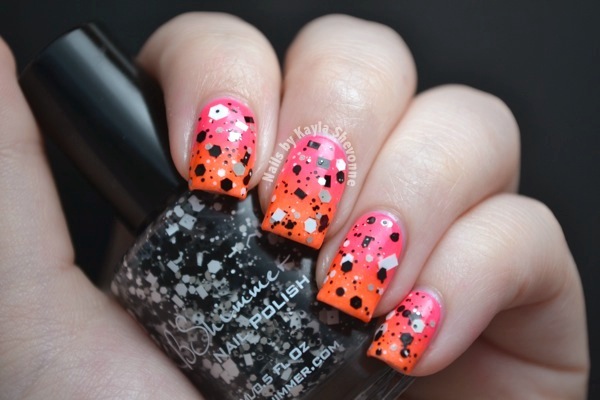
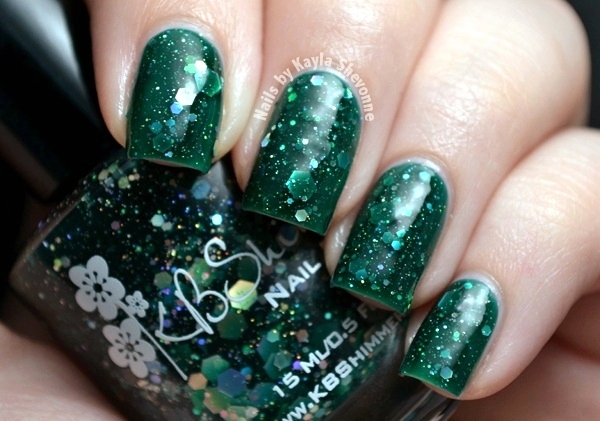
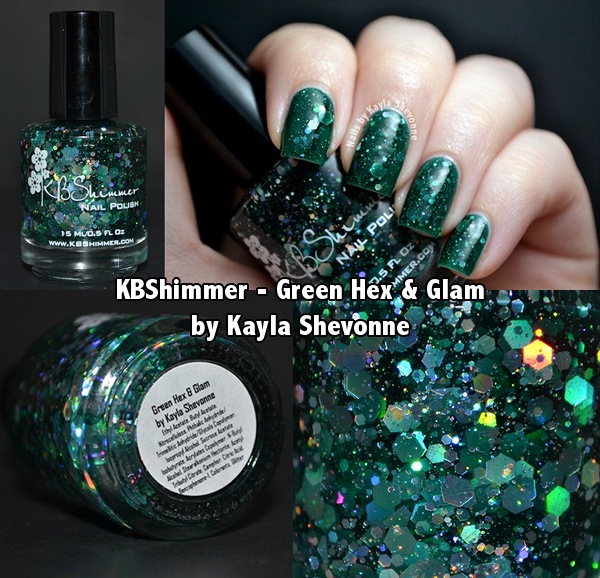
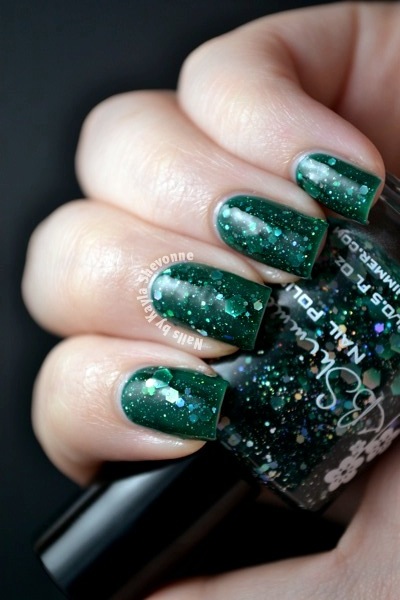
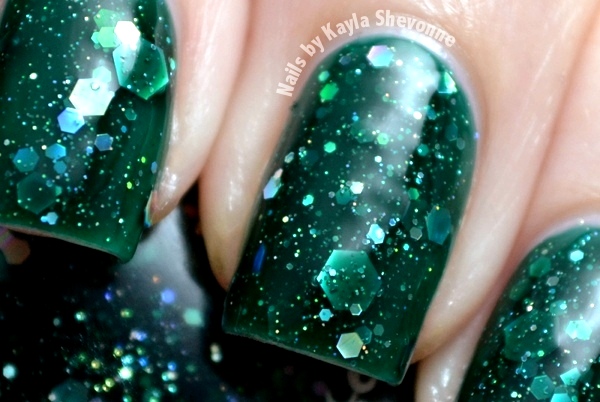
So if you haven't already entered to win your own bottle of the VERY limited edition KBShimmer Green Hex & Glam, you can do so by heading over to this post. And if you have already entered, let me remind you that you're able to share the giveaway via any of your social media outlets every day, so you can still receive some extra entries over the next few days.

Good luck! :)

Saturday, July 20, 2013

(LOTS of) Pictures from Nicole Night!

If you missed yesterday's post about Nicole Night, let me quickly fill you in. Nicole Night was an idea brought to me by Nicole by OPI Canada who wanted me to host an evening of nail polish fun. They sent me all sorts of polishes and manicure necessities as well as pizza and snacks and I invited a few blogging and non-blogging friends over for the festivities. Ladies in attendance who you definitely already know include Rebecca from Rebecca Likes Nails and Kelsie from Kelsie's Nail Files.

I'll be honest and say that I was a bit nervous at first and I definitely had some hosting jitters, but it turned out to be SO much fun! I'm oh so glad that I decided to do it!

We were tweeting and instagramming the whole night, so I'm sure some of you have already seen a bunch of photos, but Kelsie and I also took some non-phone photos, so I'll be sharing those with you today. And if you missed the other photos, just search the hashtag #NicoleNight on twitter and/or instagram.


Lemon Lolly is a bright sunshine yellow packed with lots of fine yellow glitter. I thought for sure that this was going to be sheer and thick, but the formula was actually quite good. It applies nicely and provides full coverage with three coats. It looks like coloured sugar on my nails!


In choosing the shades for this mani, I pawed through my stash of butter LONDON polishes and picked out two favourites - Trout Pout and Slapper. I've been loving coral polish a lot lately, and it's pretty obvious that I always love a good teal. Plus these two go together beautifully.


I love wearing full graphic designs like this, especially when they look much more complex than they really are. I swear, this is really easy to do! In fact, I posted a tutorial for this design so be sure to check that out to truly see how easy this design is to achieve.


One weird thing about this design: I wanted to switch it up a bit, so I had originally planned for an accent nail using the inverse colour scheme (so Slapper was the base colour and Trout Pout was used in the middle of the print). I hadn't done this with any of my previous ikat manis, so I thought it would be a nice change. However something went horribly wrong! Well maybe that sounds a bit dramatic, but either way, something did go wrong.

When I was adding the white parts, it seemed that Slapper altered the colour of the white, sort of yellowing it. I thought that was a bit off, but figured adding another coat of the white would fix it. But the same thing happened to the next coat, and the two subsequent coats after that! Very strange. The perfectionist in me couldn't allow for one of my nails to look off, so I removed everything from that nail and started over with Trout Pout as the base.

Now this wasn't such a nuisance for my left hand where I only had one nail painted with Slapper, but on my right hand I had done a complete opposite design where Slapper was on four of my nails and Trout Pout was supposed to be the accent nail. Oh boy. So needless to say, don't use Slapper as a base colour if you intend to use white over it for nail art.

Has this happened to anyone before? Am I on my own here?


The base colours here are all cremes from the recent China Glaze Sunsational Collection. Starting at my index nail there's Too Yacht to Handle, Neon & On & On, That's Shore Bright and Highlight of My Summer. Then, since I knew I wouldn't be top coating the final design, I applied a coat of Seche Vite to smooth everything out before adding the textured elements.


After allowing that to dry completely, I grabbed a few of the shades from the China Glaze Texture Collection and just did some random designs on each nails. Let's break them down one by one:

On my index nail I used striping tape to block off a couple of sections and then filled them in with China Glaze Bump & Grind.

My middle nail, which is my favourite of the bunch features a drippy design done with China Glaze Of Coarse!. I'm definitely going to redo this one as a whole mani because I love how nicely the colours go together.

My ring nail (and also my thumb nail which isn't pictured) has just a few simple polka dots done with a dotting tool and China Glaze Unrefined.

Finally, on my pinky nail I just drew a couple of chevron shapes using China Glaze Itty, Bitty & Gritty. I actually had to redo this nail because my first choice for the textured polish was In the Rough, which is a light chartreuse shade. But boy oh boy, it did not look nice over Highlight of My Summer!


I'm still loving the textured trend and I'd actually really like to see China Glaze do more of these textured cremes.

Thanks for looking!

Monday, July 08, 2013

KBShimmer - The Dancing Green & Totally Tubular from the Summer 2013 Collection

When Christy from KBShimmer was sending me my collaboration polish Green Hex & Glam (enter to win a bottle here!), I asked her if I could also place an order for some of her other polishes. I picked up six, including top coat. Two of them you already saw in the guest post I did for the KBShimmer blog, another two of which I'll show you today, and the final one which I'm sure will show up in another post at another time.


The Dancing Green is a fresh grassy green jelly base packed with fuchsia, blue and chartreuse glitters in various sizes and shapes. I knew I'd love this one because Christy always steals my heart with her jelly based glitter polishes. The formula was really great - I didn't have any trouble getting any of the glitters out of the bottle and the polish glided really nicely on my nails. My swatch shows three coats.


Totally Tubular is a very blue-leaning teal base with lots of fuchsia, purple and blue glitter throughout. This one has a creamier base than The Dancing Green, but it's not too creamy that the glitters gets lost. It's just right. As with TDG, I had no trouble getting any of the glitters out of the bottle and they distributed nicely on my nails. The formula was really great and I needed just two coats for full opacity.


There's only two left from the Summer 2013 collection that I don't own (Blinded by the Bright and Pimp My Pride), so I'll have to get my hands on them to complete the set.

KBShimmer polishes are available directly from the KBShimmer website for those of you in the US. But don't worry if you're not in the US because they're also available from Harlow & Co. They always sell out pretty quickly from Harlow & Co., so be sure to keep up with them for restock info.

Saturday, July 06, 2013

Review & Swatches - Color Club Kaleidoscope Collection

A few weeks ago I met up with my friend Rebecca to exchange Christmas gifts. Yes, you read that right, Christmas gifts. We live in the same province, and not even too far away from each other, but it took us that long to find the time to meet up. However the wait was worth it because a few holidays/special occasions had passed, so Rebecca actually had a bunch of gifts for me! It was my birthday, engagement and Christmas presents all in one!

One of the gifts was a couple of Color Club sets that she picked up from Winners, and today I'm going to share swatches of one of them with you - the Color Club Kaleidoscope Collection.


Abyss is a medium teal creme. This is a nice colour, definitely very "me". The formula was good, although it didn't self-level all that well. My photos show two coats.


Bright Night is a vivid royal blue creme. Oh this is such an awesome colour! I don't think I have anything quite like this. It does dry down pretty flat, so you'll want to add a top coat if you want that shiny look. The formula was really good and I used two coats for my swatch.


Endless is a light pink creme. Nothing original about this one, but it's a nice pink. It actually reminds me of China Glaze Something Sweet, which is one of my go-to light pink polishes for nail art. The formula was easy to work with and I've shown three coats below.


Evolution is a light sky blue creme. Again, nothing too unique here, but it's a good colour. The formula was on the thin side so I did need three coats for full coverage.


In Theory is a clean coral-orange creme. This is a great colour with a great formula. I have a few coral shades in my stash but this one feels different to me. I used three coats for my photos below.


Pearl-spective is a pearlescent shimmering top coat. It's the only non-creme of the collection, but it could be used to transform any of the cremes into a wonderful shimmer. I've shown it here over Bright Night, which I think is a great combo. The formula was great and I needed just one coat to get all of that shimmer.


Overall, this is a nice collection. There's a few shades that are easily dupe-able, but there's also a few that feel pretty unique to me. My top picks are Bright Night, In Theory and Pearl-spective.

Like I said above, Rebecca picked this set up from Winners. However Color Club is also available from many online retailers, such as Nail Polish Canada.

Thanks for stopping by!

Wednesday, July 03, 2013

Guest Post for KBShimmer Blog

Good morning!

I did a guest post over on KBShimmer featuring this bright and fun summer gradient manicure! Check it out here to see more photos and to learn more about how I achieved this look.


Thanks for looking!

Tuesday, July 02, 2013

3 Year Blogaversary Giveaway!

Giveaway time!


On June 26th, 2010, I posted my very first blog post. It was a nail art post and honestly, the art itself wasn't too bad! I've definitely seen worse from myself. It was a basic splatter design with some polka dots. The lighting, background and pretty much everything else about the photo were terrible, though. But it's so fun to look back and see how far I've come!


Obviously I'm where I am today because of you guys. If it wasn't for your continued support and encouragement, I not only wouldn't have stuck with blogging, but I certainly wouldn't have started a career in the nail industry. So as corny as it sounds, this blog has truly changed my life.

I wanted to do something extra special as a thank you to you guys, so I teamed up with Christy from KBShimmer and created a custom, limited edition nail polish. I showed you many pictures and swatches of it yesterday in this post, so be sure to check that out if you missed it. And in today's post I'll be giving away four bottles of my polish Green Hex & Glam! There were only six bottles of this made (I have two myself), so it's a pretty limited edition polish!


You can enter to win one of the four polishes by filling out the Rafflecopter form below. There are many different ways to enter the giveaway, so choose whatever options work best for you. The boring (albeit necessary) rules for the giveaway can be found below in the "Terms and Conditions" section of the Rafflecopter form.

a Rafflecopter giveaway
Good luck!

Edit: A few of you have been wondering if this polish will be sold in the KBShimmer store and at this moment, there are no plans for that. I'd love it if Christy wanted to sell something that I had a part in creating, but ultimately that's up to her. So as of right now, there is only six of these polishes in existence!

Monday, July 01, 2013

Introducing Green Hex & Glam - A Nails by Kayla Shevonne & KBShimmer Collaboration Polish

Good morning!

First of all, I have to say Happy Canada Day to all of my fellow Canadians! It's a bit of a dreary day here in NL, but at least I have a super exciting post to make up for it!

June 26th was my 3 year blogging anniversary! That's right, 3 years! I can hardly believe it's been that long.

I wanted to do something extra special to celebrate this milestone, so I contacted Christy from KBShimmer and asked her if she'd be interested in collaborating with me to create a custom nail polish. When she said yes, I knew exactly what I wanted to create. I've said before that KBShimmer I Got A Crush On Blue is an all-time favourite indie polish of mine, and I always thought that there should be a green version of it. So that's exactly what I asked Christy to do!

Next I had to decide on a name. I wanted to do a play on the book title Green Eggs & Ham, so I came up with Green Hex & Glam! I absolutely love the name.

So without futher ado, I present to you KBShimmer Green Hex & Glam by Kayla Shevonne!


Green Hex & Glam is a deep emerald green jelly base packed with different sizes of holographic hex glitters. Much like I Got A Crush On Blue, Green Hex & Glam has quite a lot of depth to it.


Formula wise, Green Hex & Glam was excellent. It glided really easily onto my nails. I did store the bottle upside down for a few minutes before applying so that all of the larger hex pieces would redistribute. I still had to fish a couple of the bigger pieces out, but it's totally worth it in my opinion. My photos all show three easy coats. Two coats would give a more transparent/jelly-ish look, but I personally wanted that deeper rich green.


I truly love this polish. It's one that I'll definitely be wearing with pride! Thanks so much to Christy for making my vision a reality.


And just for fun, here's a big ol' in-your-face macro bottle shot.


So what do you think about my collaboration shade with KBShimmer? If you like it, you should check back tomorrow because I'll be giving away a few bottles of this beauty! I was going to do both the giveaway and swatches in one post, but I thought it would get too long and wordy. Plus, it gives you more time to drool over the shade this way, hehe. ;)

Thanks for stopping by!
Newer Posts Older Posts Home