Good morning!
Welcome to March's featured blog post!
For my newer followers who haven't seen one of my featured blog posts before, check out the Featured Blogs tab at the top of the page for more information and to see past blogs that I've featured.
March's blog is one that was suggested to me by some polish friends on Facebook. To my surprise, I had actually seen some of Amber's work before and I was taken aback when I learned that she had a blog! I decided right away that she would be this month's feature.
On her blog you'll find a lot of amazingly done freehand nail art, as well as some stamping, reviews and swatches mixed in as well.
Here's a sneak peak of her work (and probably my personal favourite of her designs):
Keep reading to see more of Amber's great nail art!
Tuesday, March 27, 2012
New Trend - The Caviar Manicure
Good morning!
Have you all heard of the new emerging nail art trend called "The Caviar Manicure"? The trend first started popping up on runways last year but now the brand Ciate will be selling kits through Sephora to create this look. Basically, it's just microbeads stuck to the nail, but the end result looks pretty cool.
The Ciate kits are going to be pretty pricey, so I decided to see if I could recreate the look with supplies I already own. Ages ago I bought some microbead kits at Wal-Mart that were on clearance, so I dug those out and picked out a vial that included some fuchsia, silver and foil green beads. The Ciate mani is done with black and blue but considering the season, I wanted something a little brighter.
I only did did the caviar look on an accent nail since I really didn't know how practical it was going to be. On the rest of my nails, I picked out polish colours that matched the colours of the beads I chose and just did some simple dots.
Products used:
CND Stickey Base Coat
Color Club - Perfect Mol-ten (base)
Essie - Jamaica Me Crazy (dots, base for caviar nail)
Microbeads from Wal-Mart
Seche Vite Top Coat
Unfortunately, top coat significantly dulls the colours of the beads so I wasn't able to add any to the caviar nail. I'm not sure if the Ciate beads will also dull if top coat is added but I foresee the beads falling off fairly quickly without something to really keep them in place. Regardless, I'll let you guys know how long my caviar nail lasts.
What do you guys think of this new trend? It's definitely not going to be everyone's cup of tea, but I'm totally diggin' it.
Monday, March 26, 2012
Tutorial - The Hunger Games "Girl on Fire"
Hey guys!
Since it was requested, I decided to do up a tutorial for my "Girl on Fire" nail design. Plus, I haven't done a tutorial in far too long so it's way overdue.
Hopefully some of you still haven't seen the film and thus you'll be able to follow this tutorial and wear this mani when you go see it. And if you're not interested in The Hunger Games books and/or movie, this can just be done as a fierce, fiery mani!
To refresh, here's the finished design:
Keep reading for the tutorial!
Read more »
Sunday, March 25, 2012
Pretty & Polished - Jawbreaker
Good morning!
Today I have a very special polish to show you - it's Pretty and Polished Jawbreaker. I fell in love with this polish as soon as I saw the first swatch of it and when I finally got a bottle of my own, it definitely didn't let me down.
Jawbreaker is a milky white jelly base with just the right amount of multi-color, multi-sized and multi-shaped glitters mixed throughout. The polish creates a "glitter sandwich" manicure all on its own.
For anyone who doesn't know, a glitter sandwich is when you apply a coat or two of a sheer jelly polish, then a layer of glitter and then another layer of the jelly polish, essentially sandwiching the glitter between the layers of the jelly polish. For some examples, check out this post by Rebecca over at Goose's Glitter.
Well, forget all that layering because with Jawbreaker, you've already got yourself a glitter sandwich!
The formula is good and it applies really easily. As well, it's self-leveling, which is always good, especially when it comes to jelly-type polishes. My swatch is 2 coats but it could have used 1 more.
I'm totally head over heels for this polish and I actually think that this has just skyrocketed right into my top 10 all-time favourite polishes! I'm definitely going to need to get myself a full-sized bottle of it.
Pretty and Polished polishes can be bought through Chelsea's Etsy shop. Jawbreaker is sold out right now but Chelsea is always updating her stock, so keep checking.
Friday, March 23, 2012
The Hunger Games Nail Art #2
Good afternoon!
Are you all excited for the opening of The Hunger Games today? I sure am! I'm going to see the 6:30pm IMAX showing and I can't wait! I know some of you may have gone to the midnight showing last night so please, no spoilers!
Today's nail art is basically a recreation of the cover of the book. This design has been done a number of times but I think the first place I saw it was tutorial by on youtube. I did the grey circular shapes (which, in my mind, represent the districts and their connectedness, but I could be totally off the mark) on most of my nails and then I did the mockingjay pin as an accent nail.
Enjoy! And May the Odds Be Ever In Your Favor!
(Am I a total dork for just saying that? Probably.)
Products used:
CND Stickey Base Coat
China Glaze - Liquid Leather (base)
China Glaze - Recycle (circular shapes)
China Glaze - Lemon Fizz (mockingjay pin)
OPI - Bling Dynasty (highlights on mockingjay pin)
Seche Vite Top Coat
Thursday, March 22, 2012
Manicuring 101 - Cuticle Care
Hey guys!
It's been far too long since I've posted an instalment for my Manicuring 101 Series! So for any of my followers who haven't seen any posts from this series yet, check out the Manicuring 101 tab at the top of the page and you'll find links to all of the other posts from this series.
My last Manicuring 101 post was all the way back in November and it covered all the different types of nail files. At the end of that post, I mentioned that the next post for the series would cover beveling, which is a part of the filing process. However, my nails do not currently need filing so I'm going to put that post on hold until I can get good photos of the beveling process for you.
In the meantime, today's post is a very important one - cuticle care! I'll discuss topics that include removing cuticles, pushing them back and moisturizing them. In addition, I'll let you know what cuticle care products I personally recommend.
I worked with Sarah from Chalkboard Nails to re-design my entire blog and this is what we came up with. You all know how much I love animal print and since my favourite colours are purple, teal and green, Sarah suggested a peacock-inspired theme.
It turned out kind of retro and funky but Sarah still kept in mind that I wanted a relatively simple and classy design. She did such an amazing job and I'm so very happy with how it turned out! Thanks again Sarah!
In order to make this change, I had to remove the Intense Debate commenting system that I had installed on my site. That system gave me nothing but trouble so I'm happy to be rid of it, but sadly, all of the lovely comments that you all left for me using the Intense Debate system are now gone. I can still see them by logging into my Intense Debate account but they're no longer visible on my site. This was the one and only downfall of re-designing my site but I was willing to make that sacrifice and I'm excited about the fresh start with my new site.
Anyways, that's it for today but stay tuned for more exciting things in the near future!
Friday, March 16, 2012
St. Patrick's Day Nail Art - Green Skittles
Hey guys!
Today I'll be showing you the final design in my St. Patrick's Day series. For today's design, I had a number of simple ideas running through my head, but I couldn't land on just one. So, I decided to incorporate all of the ideas by creating a St. Patrick's Day skittle mani!
For my pinky nails, I did a simple green striped mani, and for my ring nails I did a green dot design that's reminiscent of my rainbow polka dot design. For my middle nails and thumb nails (not pictured), I simply did 2 coats of Nubar Reclaim, which is a gorgeous green linear holo. And finally, for my index nails, I did a subtle ruffian with a basic shamrock accent. I've totally fallen in love with the ruffian mani and I can foresee many more of them in my future!
Enjoy!
Products used:
CND Stickey Base Coat
Essie - Mint Candy Apple (base on pinky, lightest dots on ring, shamrock on index)
China Glaze - Holly-Day (dark stripe on pinky, darkest dots on ring)
China Glaze - Gaga for Green (light stripe on pinky, lime dots on ring, inside of shamrock on index)
China Glaze - Starboard (medium dots on ring, creme section of ruffian)
Nubar - Reclaim (middle and thumb)
OPI - Here Today...Aragon Tomorrow (base for ruffian)
Seche Vite Top Coat
Thursday, March 15, 2012
Claire's - Candy Shop
Good morning!
Claire's Cosmetics recently released a new shade called Candy Shop, which is a pink jelly base with an array of multi-coloured and multi-sized glitters. Sound familiar? That's because it's a duplicate of Deborah Lippmann's Candy Shop from the Get This Party Started Set!
I've been wanting both Candy Shop and Forget You from that set for a while now but I just can't justify that price tag. So I'm glad to to say that Claire's Candy Shop has been able to kill one lemming!
The sheer pink jelly base of Candy Shop would probably do best layered over a similarly coloured pink creme, but I did 2 coats of Candy Shop alone for my photos so that you could see the true colour. You can see that there's still some VNL, so if you did want to wear it alone, you'd have to go for 3 or maybe even 4 coats.
This is the first polish from Claire's that I've tried so I'm assuming that the brush is the one they use for all of their polishes. Well, I'm not a fan. I find it far too thin and it doesn't pick up enough polish to cover the entire nail.
Unfortunately, I don't own the Deborah Lippmann Lippmann Candy Shop so I can't tell you if they're dead-on dupes. However, from what I've seen, they look pretty darn similar. And for less than a third of the price (Lippmann polishes sell for about $18 each, while the Claire's version is $5 US or $5.75 CDN), you can't beat that!
Now if only someone would release a dupe for Forget You, I would be a very happy girl.
Tuesday, March 13, 2012
St. Patrick's Day Nail Art - Green Watercolor
Hey guys!
Today I have another design to add to my St. Patrick's Day Series! I'm running pretty thin on ideas for this series so I'm basically doing more abstract designs, just with the holiday-appropriate colours.
Today's mani uses a technique that was first seen on this video by BeautyGeeks. Rebecca came across the video and since then we've seen a number of really cool interpretations of this mani, such as this one by Sarah of Chalkboard Nails.
I decided to give the watercolor technique a try by using a variety of green polishes and I'm really happy with the way it turned out. I thought that the greens might get muddled together and just end up looking dirty, but they all stand out separately yet blend together to create a really cool look.
Enjoy! And check out the tutorial by BeautyGeeks that I posted above if you want to try this look for yourself.
Products used:
CND Stickey Base Coat
China Glaze - White on White (base)
China Glaze - Holly-Day (darkest green)
China Glaze - Starboard (medium green)
China Glaze - Gaga for Green (lime green)
Essie - Mint Candy Apple (mint green)
Seche Vite Top Coat
Monday, March 12, 2012
From the Vault: St. Patrick's Day Nail Art - Pot of Gold
Good morning!
Today I have a quick post to show you a nail art design that I did last year for St. Patrick's Day! I did post this mani at the time but I know that many of you weren't following me then, so I thought I'd share it again.
Thinking about it now, if I were to re-do this mani, I would probably only do the pot of gold as an accent nail and do something less complex on the rest of the nails. I guess I had more time on my hands when I did this design originally!
Anyways, enjoy!
Products used:
China Glaze Strong Adhesion Base Coat
Orly - Green Apple (base)
OPI - Holiday Glow (pot)
China Glaze - Treasure Chest (gold in pot)
China Glaze - Salse (red of rainbow)
Color Club - Wham! Pow! (orange of rainbow)
Color Club - Almost Famous (yellow of rainbow)
China Glaze - Kiwi Cool-Ada (green of rainbow)
Color Club - Chelsea Girl (blue of rainbow)
China Glaze - Flying Dragon (purple of rainbow)
Seche Vite Top Coat
Sunday, March 11, 2012
Nubar - Indigo Illusion
Good morning!
Today I'm showing you one of the polishes I got in my Secret Polish Exchange package! This one is Nubar Indigo Illusion and it's been on my wishlist for quite some time.
Indigo Illusion is the absolute definition of a multichrome. It shifts from a dusty blue to purple to green to gold. Plus, it has a strong pink-red flash running through it.
This is the first Nubar that I've tried so I didn't know what to expect in regards to the brush and the formula/application. But all were great! The brush is easy to use (it's similar in style and size to China Glaze brushes) and the formula, although a little thin, was quite good. Indigo Illusion starts off sheer but it builds easily and my swatch is just 2 coats.
Nubar Indigo Illusion is a permanent shade so it's not hard to come across. You can buy it directly from bynubar.com or on eBay, which after a quick search turned up several results at good prices.
Stay tuned for more swatches from my Secret Polish Exchange haul!
Friday, March 09, 2012
St. Patrick's Day Nail Art - Leprechaun Hat
Good afternoon!
Today I have the first design in this year's St. Patrick's Day series! There'll only be a couple of designs for this series but hopefully it'll be enough to give you all some ideas for your own Paddy's Day nails!
For this design I was only planning to do the colour blocking that you see on all the nails except my ring finger. But as the manicure evolved, I decided to take it a step further and I made the ring nail look like a little leprechaun hat!
Enjoy!
Products:
CND Stickey Base Coat
OPI - Jade is the New Black (base)
China Glaze - Liquid Leather (black accents)
OPI - I Get a Kick Out of Gold! (gold accents)
Orly - Green Apple (clover)
Seche Vite Top Coat
Thursday, March 08, 2012
Pretty & Polished - Martian Salad
Good morning!
Today I have another "indie" creation for you! This is another polish by the lovely Chelsea from Pretty and Polished. The one I have for you today is called Martian Salad and it's a bright, shining kelly green holo.
My pictures definitely don't do the holo justice, but I was unable to get any shots of this in the sunlight (oh the woes of living in Newfoundland). You can still see the holo peeking through in my photos though, so just picture it amplified!
Martian Salad applied really nicely and didn't have any of the issues that plague some other holographic finish nail polishes (I'm looking at you especially, Nfu-Oh). My swatch is 2 coats and I was almost able to get away with just 1 coat, but I did 2 for good measure.
Pretty and Polished polishes can be bought through Chelsea's Etsy shop. Martian Salad is currently sold out but according to Chelsea, many of her shades will be restocked very soon (read: sometime today).
As I mentioned before, Chelsea offers all of her polishes in both full and mini sizes. This is great if you're on a budget but would still like to try out a couple of shades! Her prices are also really reasonable - $8 for a full size and $4.50 for a mini. And something I didn't mention before is that all of her polishes are 3 free!
More Pretty and Polished shade to come!
Wednesday, March 07, 2012
Haul - Secret Polish Exchange
Good morning!
I've mentioned the polish group I'm a part of on Facebook called Peace, Love & Polish. Well, some of the girls from that group did a Secret Santa exchange for Christmas last year and we all had so much fun that we decided to have another one for Spring! I am so pleased with what my "Secret Santa" sent me that I just had to share it with you guys.
Here's a photo that I took with my phone before ripping into my package:
See how nice and pretty everything is? I almost didn't want to open anything! But I did, of course.
Here's a crappy phone picture of everything that I received (I'll go into more detail below):
And here's a much better picture of just the polishes:
Many of these were on my wishlist and the ones that weren't are also amazing! She really went out of her way.
Aside from the polishes, she sent me:
- A gorgeous handmade purple infinity scarf (I ADORE infinity scarves, FYI)
- A dolphin case for my phone
- A super cute pair of tweezers
- A zebra print nail file
- A notepad with a K and accents of cheetah print (she did her research so well with all the animal print!)
- An EOS lip balm in my favourite flavour, Strawberry Sorbet
- OPI Expert Touch remover and wipes (neither of which I've tried before so I'm excited to see what I think of them)
- Candy and chocolate, of course
Interestingly, Air Heads are my absolute favourite candy and she sent me a limited edition package that contained flavours I've never even heard of. One of the flavours was Pink Lemonade and it was seriously the best tasting candy I've ever had in my whole life. I would buy them by the buckets if I could find them in my area! So if you ever come across them, enjoy one for me!
Anyways, that's it for my Secret Polish Exchange haul. I hope you enjoyed seeing all of my new goodies!
I've mentioned the polish group I'm a part of on Facebook called Peace, Love & Polish. Well, some of the girls from that group did a Secret Santa exchange for Christmas last year and we all had so much fun that we decided to have another one for Spring! I am so pleased with what my "Secret Santa" sent me that I just had to share it with you guys.
Here's a photo that I took with my phone before ripping into my package:
See how nice and pretty everything is? I almost didn't want to open anything! But I did, of course.
Here's a crappy phone picture of everything that I received (I'll go into more detail below):
And here's a much better picture of just the polishes:
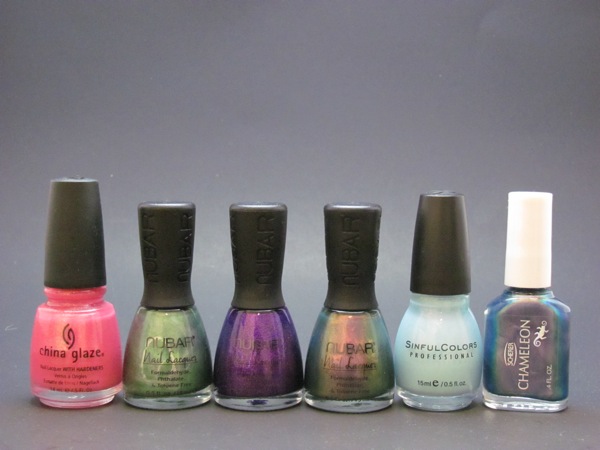
China Glaze 100 Proof Pink, Nubar Reclaim, Nubar Violet Sparkle, Nubar Indigo Illusion, Sinful Colors Cinderella and Chameleon Blue Sky
Many of these were on my wishlist and the ones that weren't are also amazing! She really went out of her way.
Aside from the polishes, she sent me:
- A gorgeous handmade purple infinity scarf (I ADORE infinity scarves, FYI)
- A dolphin case for my phone
- A super cute pair of tweezers
- A zebra print nail file
- A notepad with a K and accents of cheetah print (she did her research so well with all the animal print!)
- An EOS lip balm in my favourite flavour, Strawberry Sorbet
- OPI Expert Touch remover and wipes (neither of which I've tried before so I'm excited to see what I think of them)
- Candy and chocolate, of course
Interestingly, Air Heads are my absolute favourite candy and she sent me a limited edition package that contained flavours I've never even heard of. One of the flavours was Pink Lemonade and it was seriously the best tasting candy I've ever had in my whole life. I would buy them by the buckets if I could find them in my area! So if you ever come across them, enjoy one for me!
Anyways, that's it for my Secret Polish Exchange haul. I hope you enjoyed seeing all of my new goodies!
Tuesday, March 06, 2012
Mixed Dots Mani (Inspired By My Stamping Plate Holder)
Good morning!
Today's nail art design is the one that I had planned to do last week but ran out of time, so I ended up with my bright pink and yellow cheetah design. This time I allotted myself a lot of time to paint my nails so I was able to complete my vision!
This design was inspired by the photo album that I use to hold all of my stamping plates. I've always been intrigued by the pattern but I've never wanted to take on that many stripes. So, I decided to switch it up a bit and change the stripes to a more manageable design - dots!
I chose colours that matched the pattern on the book and where the stripes are larger, I made larger dots, where they're small, I made small dots, etc. I like how it turned out and maybe one day I'll take on the actual pattern of all the stripes.
Enjoy!
Products:
CND Stickey Base Coat
China Glaze - White on White (base)
China Glaze - Breakin' (orange dots)
Illamasqua - Purity (light orange dots)
OPI - Kiss Me on the Tulips (pink dots)
OPI - Rumple's Wiggin' (light purple dots)
OPI - Funky Dunkey (purple dots)
Zoya - Robyn (blue dots)
China Glaze - Re-fresh Mint (light green dots)
China Glaze - Gaga for Green (green dots)
China Glaze - Lemon Fizz (yellow dots)
Seche Vite Top Coat
Monday, March 05, 2012
Pretty & Polished - Wham Bam Thank you Ma'am!
Good afternoon!
Today I have my very first "indie" polish brand to show you! I'm starting to see indie brands really taking off this year and that's really exciting because they offer something new and totally different to the world of polish.
The polish I'll be showing you today is from Chelsea of Pretty and Polished. Chelsea was kind enough to send me a few of her polishes to try out and since trying them, I've already placed an order at her Etsy store. And I'm already gearing up for another order because my Etsy cart is once again stocked with Pretty and Polished shades!
Today's polish is called Wham Bam Thank You Ma'am and it's a sheer purple jelly packed with multi-sized and multi-coloured glitters. My favourite thing about this polish is that it's inspired by a Facebook group that I'm in (along with Chelsea, obviously and many other nail bloggers and enthusiasts alike).
For my swatch, I applied 1 coat of Wham Bam Thank You Ma'am over 2 coats of China Glaze Virtual Violet, which I think is the perfect base for this polish. I had no troubles with application and I didn't have to mess with the glitter to get it where I wanted it.
As a side note, this polish can reach opacity on its own (I tried on just one nail on my right hand) but it did take 3 coats and I'm just not willing to part with that much polish, so that's why I chose to layer it.
Pretty and Polished polishes can be bought through Chelsea's Etsy shop and she's quickly gaining popularity so if there's something you want, grab it up while you can!
One of the other great things Chelsea offers is both full and mini sizes of all of her polishes. This is great if you're on a budget but would still like to try out a couple of shades! Her prices are also really reasonable - $8 for a full size and $4.50 for a mini.
Stay tuned for more Pretty and Polished shades in the near future!
Sunday, March 04, 2012
Featured Blog - February: Goose's Glitter
Hey guys!
Welcome to February's featured blog post!
For my newer followers who haven't seen one of my featured blog posts before, check out my Featured Blogs tab at the top of the page for more information.
February's blog is one that I normally wouldn't choose, simply because I've made a rule for myself that I won't feature blogs that have over 500 followers, and this one does have slightly more than 500. However, in this case I've made an exception because I think this is one of those blogs that deserves A LOT more attention than it's getting.
On this blog you'll find some really amazing swatches, which is my main reason for choosing to feature Goose's Glitter. The photos are large, very clear and spot-on colour accurate. Seriously, these are excellent quality swatches. Also, there's some fun nail art scattered throughout all of the great swatches. And as if all that isn't enough to make you rush over there and follow, the blog itself is clean, stream-lined and easy to navigate, which I always love. What more can one ask for?
Here's a sneak peak of her work, which is a nail art design of the well-known standard colour blind test. This is the photo that piqued my interest for this blog and then after following and browsing, I realized how worthy it is of more attention.
As far as I'm concerned, this is a must-follow blog, so keep reading for more info and more photos!
Read more »
Friday, March 02, 2012
Bright Cheetah Print Nubbins
Good morning!
Today's nail art was completely unplanned. In fact, I had an entirely different design in mind but I ended up not having enough time yesterday to do it. And when I'm in a time crunch, I always default to some sort of animal print! So I picked some bright, spring colours and went for a freehand cheetah print.
Oh, and as a side note, I purposefully picked another colour from the OPI Holland Collection to use in this mani since I won't be doing a full review/swatch post.
You also might notice that my nails are I think the shortest they've ever been! My index nail was growing out again after the break but it was growing out unevenly. So, I filed it down a bit and then filed the others down to match. They might be a tad shorter than I would prefer but as long as the length is consistent, I'm pretty happy.
Anyways, enjoy today's mani!
Products used:
CND Stickey Base Coat
OPI - Kiss Me On My Tulips (base for all nails except ring finger, spots on ring)
China Glaze - Lemon Fizz (base for ring finger, spots on all other nails)
Konad - Black (spots)
Seche Vite Top Coat
Thursday, March 01, 2012
New Tab - My Nail Polish Collection
Hey guys!
Just a quick post today to let you know that I've decided to take on the humungous task of cataloguing all of my 1000+ polishes. I've started a spreadsheet and it's going to be publicly accessible to all of you by going to the "My Stash" tab at the top of the page.
Obviously it's going to take some time to finish this task and my goal is to catalogue at least one Melmer drawer per day. I have 15 Melmer drawers full of polish and 1 drawer is already completely catalogued. So, if we do some quick math (did I ever tell you guys how much I hate math? That's why I studied Sociology, Psychology and Criminology in University, haha), it should take about 2 weeks to finish cataloguing everything. Hopefully I'll be able to get it done sooner than that, but 2 weeks is my goal.
I'll update again when I've finished!
Enjoy this new feature!
And since there's no photos to go along with this post, I'll show you guys a photo of my hedgehog Pepper, who you first met back in September in this post.
Subscribe to: Posts (Atom)