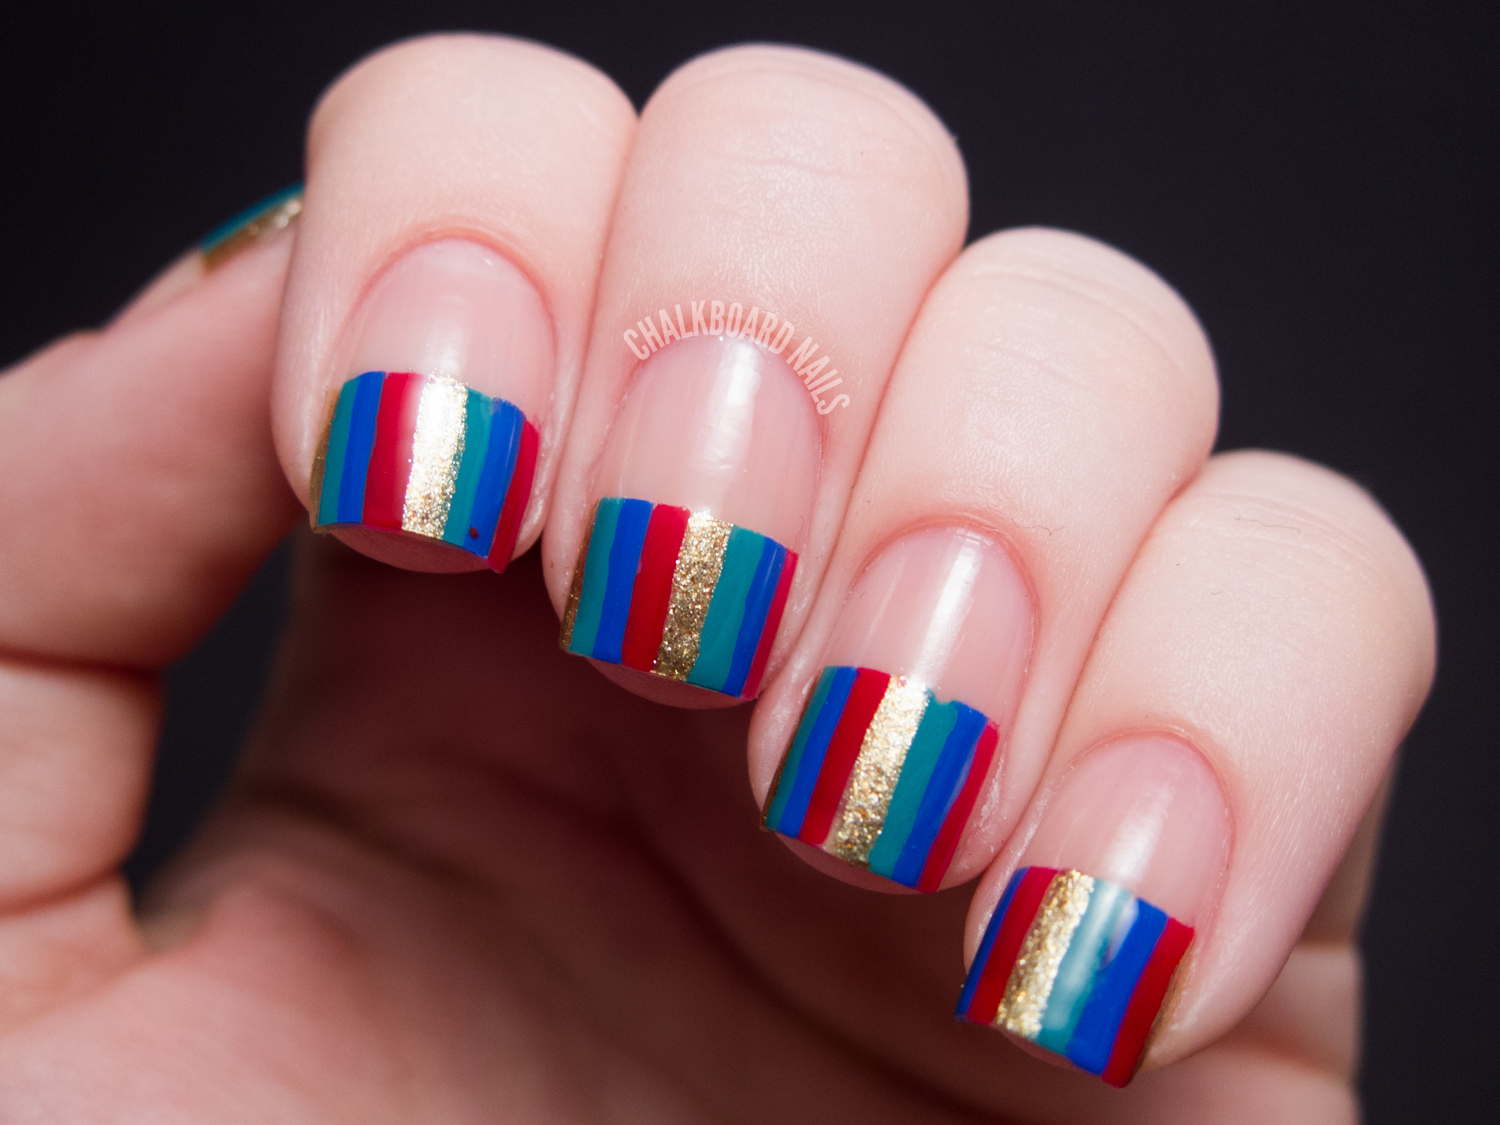
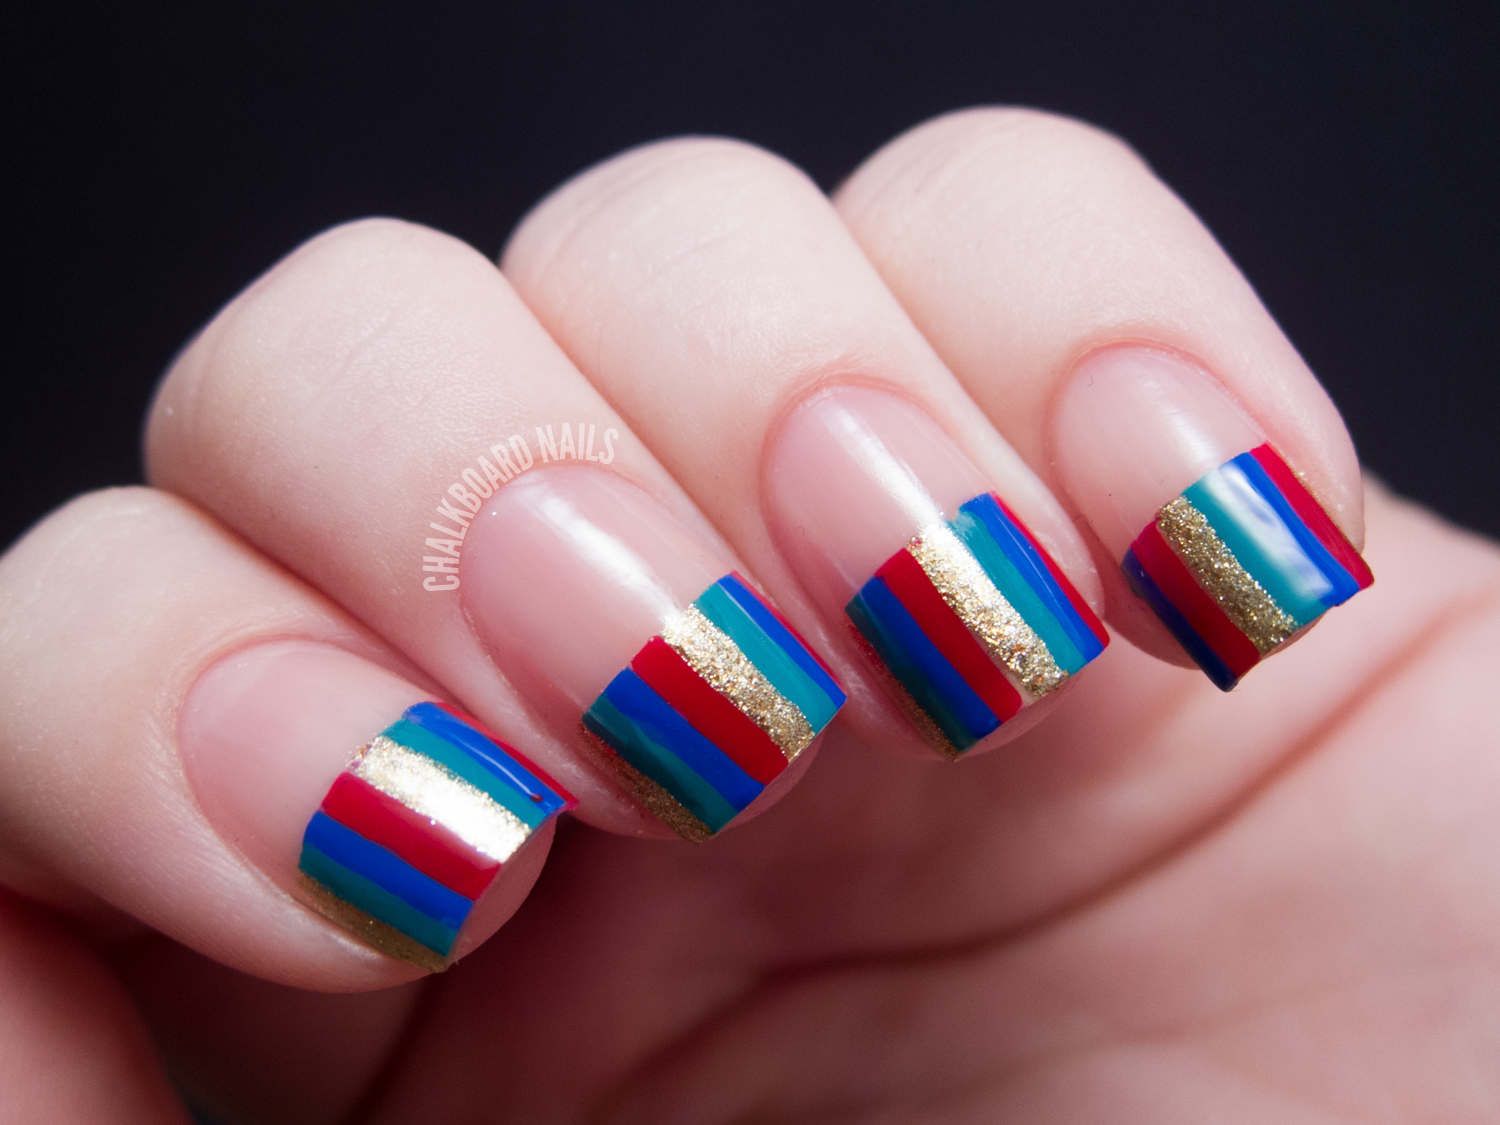
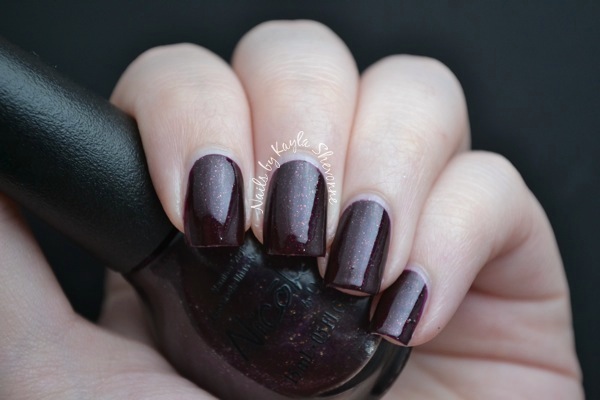
Hey friends! I am so happy to be coming to you from Nails by Kayla Shevonne. I've known Kayla since the very beginning of my descent into nail madness, and her work is always impeccable and creative. I hope that I do it justice today!
These nails are fairly easy to create. All you need to do is place some tape over the lower half of your naked nail, and then paint some stripes on the top half using a nail art striper brush. When you remove the tape, your stripe bundle is left with a totally clean edge along the bottom. Simple! The toughest part, really, is picking the colors for the design.
For my colors, I began with American Apparel Downtown LA, a super sexy red creme. Then I grabbed Essie Butler Please, a rich blue shade, and Zoya Ziv, a sparkly gold. I rounded out the group with American Apparel Malibu Green, the greenish teal shade. I think these colors looked nice together -- almost vintage -- and the inclusion of a metallic broke them up a bit.
If you don't have nail art tools, you could even use the same concept but replace the striper brush with the brushes in the polish. Your lines would come out a bit thicker but I bet that would look quite nice, too.
Thank you for reading and thank you to Kayla for hosting me on her blog! I hope you've enjoyed this look.
Sunday, January 27, 2013
YouTube Nail Art Week - Gangnam Style Nails
Heeeeeeeeeyyyyyyy sexy lady!
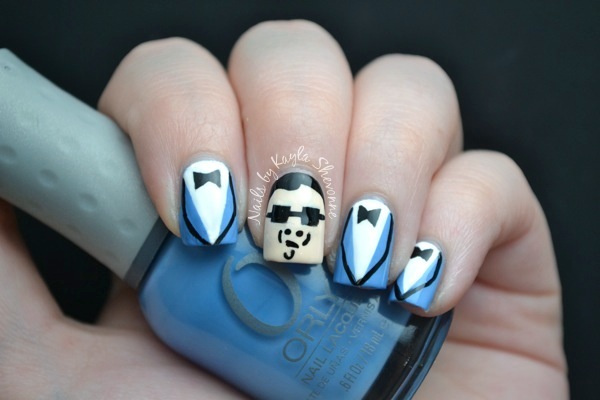
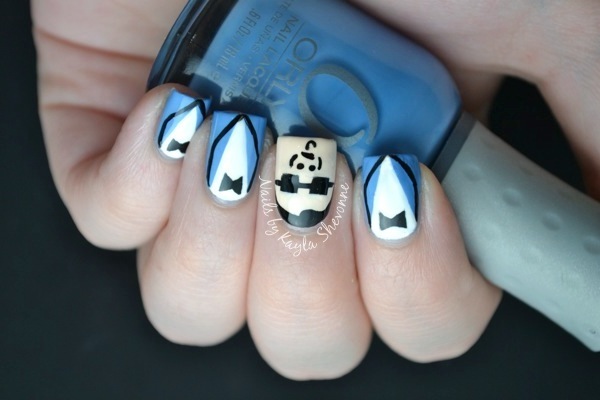
Since it's YouTube Week, I thought that it would only be appropriate to end the week out by paying homage to the most watched YouTube video of all time. You all know what it is - PSY's .
I went looking for a cute Gangnam Style tutorial and there were quite a few to choose from. So instead of choosing just one, I based my recreation on two different tutorials: one by and one by .
For all of the suit jacket nails, I started with a base of Orly Snowcone. I then used a striping brush and Sinful Colors Snow Me White to create a deep v shape down the middle. Finally, I used Wet 'n' Wild Black Creme to add the bow tie and the jacket's lapels.
For PSY's face on my middle nail, I used Lime Crime Milky Ways as the base colour. It's a really great flesh coloured polish so it worked perfectly in this design. All of the facial detailing was done with a small brush and Wet 'n' Wild Black Creme.
This part of the design seems to look better on more rounded nails because that's more similar to PSY's face shape. It's still absolutely unmistakable whose face it is on my middle nail, though.
Well that ends YouTube Nail Art Week! I hope you all enjoyed the series! I think today's recreation was probably my favourite of all, just because I love the humour of it.
Thanks for looking!
P.S. I have a couple of announcements coming in the next couple of days, so watch out for those. :)
Saturday, January 26, 2013
YouTube Nail Art Week - Whimsical Feathers
Hi guys!
It's Day 6 of YouTube Nail Art Week! Only 1 day left!
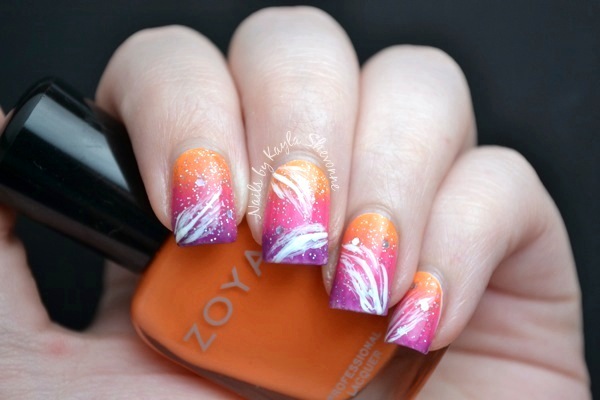
Today's whimsical design comes from user . When I saw tutorial near the end of 2012, I immediately bookmarked the link because I knew I would recreate it some day.
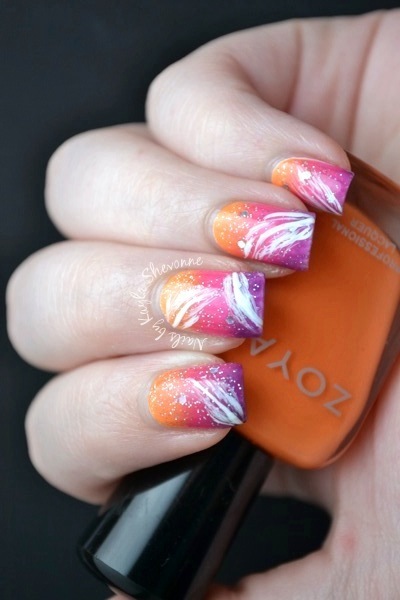
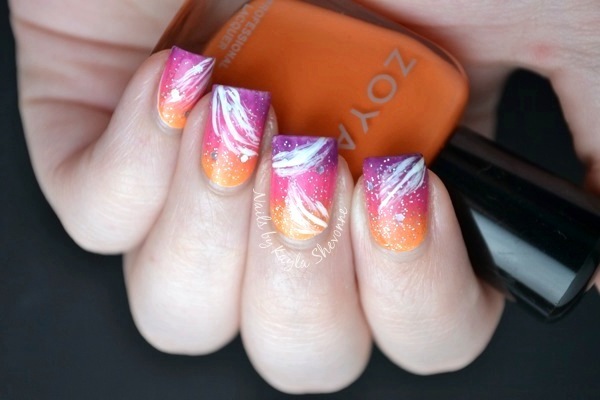
The base gradient is done using Zoya Arizona, Zoya Lara and Essence Break Through. As always, I followed the same method for creating the gradient that I showed you in my gradient nails tutorial.
Without thinking about it, I accidentally did my gradient opposite from hers. She had the darkest purple colour up near her cuticle, while as you can see, the purple of my gradient is near the tip of my nail. Luckily, it looks great either way!
Once the gradient was dry, I added the sparkle using OPI Servin' Up Sparkle. I chose this one in particular because it's not too densely packed with glitter, so it didn't overwhelm the design. Finally, I used my trusty It's So Easy Striper in White to add the feathers.
I always love doing feather designs, but I think the pretty sunset gradient in the background makes this one extra pretty.
Thanks for looking!
It's Day 6 of YouTube Nail Art Week! Only 1 day left!
Today's whimsical design comes from user . When I saw tutorial near the end of 2012, I immediately bookmarked the link because I knew I would recreate it some day.
The base gradient is done using Zoya Arizona, Zoya Lara and Essence Break Through. As always, I followed the same method for creating the gradient that I showed you in my gradient nails tutorial.
Without thinking about it, I accidentally did my gradient opposite from hers. She had the darkest purple colour up near her cuticle, while as you can see, the purple of my gradient is near the tip of my nail. Luckily, it looks great either way!
Once the gradient was dry, I added the sparkle using OPI Servin' Up Sparkle. I chose this one in particular because it's not too densely packed with glitter, so it didn't overwhelm the design. Finally, I used my trusty It's So Easy Striper in White to add the feathers.
I always love doing feather designs, but I think the pretty sunset gradient in the background makes this one extra pretty.
Thanks for looking!
Friday, January 25, 2013
YouTube Nail Art Week - Pastel Puzzle Pieces
Hi guys!
It's Day 5 of YouTube Nail Art Week!
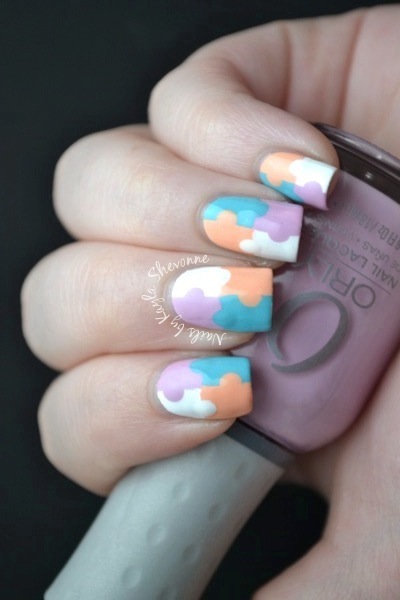
Today's recreation is a cute puzzle piece mani! It originally comes from user , and she definitely lives up to her username with this one because design truly is a simple one to execute.
I decided to go with a light, pastel colour palette for my recreation of this design. The base is Sinful Color Snow Me White and then the other three puzzle pieces are done with Orly Frisky, Orly Lollipop and Illamasqua Purity.
I've got to be honest and admit that I didn't follow the tutorial entirely. She used tape to section off the squares but I didn't have the patience for that (good on her for having that kind of patience!), so I just used a striping brush and freehanded the sections.
I like the versatility of this design quite a bit. You can switch up the colour palette to suit your own style, to match an outfit or even an occasion. For example, I can totally see a Valentine's Day version of this using red, light pink, dark pink and white! You can also add some little details to the puzzle pieces such as some little hearts or polka dots. My mind is running wild coming up with different ways this design can be worn!
Thanks for looking!
It's Day 5 of YouTube Nail Art Week!
Today's recreation is a cute puzzle piece mani! It originally comes from user , and she definitely lives up to her username with this one because design truly is a simple one to execute.
I decided to go with a light, pastel colour palette for my recreation of this design. The base is Sinful Color Snow Me White and then the other three puzzle pieces are done with Orly Frisky, Orly Lollipop and Illamasqua Purity.
I've got to be honest and admit that I didn't follow the tutorial entirely. She used tape to section off the squares but I didn't have the patience for that (good on her for having that kind of patience!), so I just used a striping brush and freehanded the sections.
I like the versatility of this design quite a bit. You can switch up the colour palette to suit your own style, to match an outfit or even an occasion. For example, I can totally see a Valentine's Day version of this using red, light pink, dark pink and white! You can also add some little details to the puzzle pieces such as some little hearts or polka dots. My mind is running wild coming up with different ways this design can be worn!
Thanks for looking!
Thursday, January 24, 2013
YouTube Nail Art Week - Grown-Up Floral Print
Hey guys!
Welcome to Day 4 of YouTube Week! I hope you've been enjoying this series so far!
Today's design is in pretty stark contrast to yesterday's bright, neon rainbow coloured one. This one is a bit more subdued and sophisticated. I love both styles, so I guess that makes me an equal opportunity nail artist, haha.
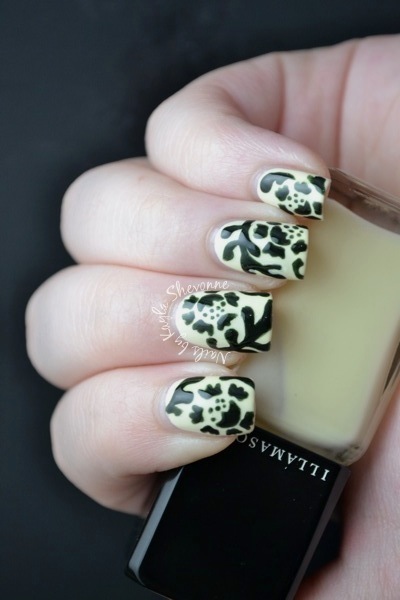
design comes from user , whose videos I really love. I knew I wanted to recreate one of her designs this week, but I had a really hard time picking because there's quite a few I want to try!
I don't own either of the polishes she used for her design, but I rummaged through my stash for similar shades. My base polish is Illamasqua Load, one of my all-time favourite polishes, and the print was done using OPI Here Today...Aragon Tomorrow.
HTAT isn't totally opaque, so I did have to go over the print twice in order to get the colour payoff I wanted. That made this a lot more time consuming, so if you're going to give this print a try, I would definitely suggest using a polish that provides more opacity.
I love this print so much it's freaking ridiculous. I definitely need a little more practice at it since her original is a million times better than my recreation, but I'm happy with regardless.
Thanks for looking!
Welcome to Day 4 of YouTube Week! I hope you've been enjoying this series so far!
Today's design is in pretty stark contrast to yesterday's bright, neon rainbow coloured one. This one is a bit more subdued and sophisticated. I love both styles, so I guess that makes me an equal opportunity nail artist, haha.
design comes from user , whose videos I really love. I knew I wanted to recreate one of her designs this week, but I had a really hard time picking because there's quite a few I want to try!
I don't own either of the polishes she used for her design, but I rummaged through my stash for similar shades. My base polish is Illamasqua Load, one of my all-time favourite polishes, and the print was done using OPI Here Today...Aragon Tomorrow.
HTAT isn't totally opaque, so I did have to go over the print twice in order to get the colour payoff I wanted. That made this a lot more time consuming, so if you're going to give this print a try, I would definitely suggest using a polish that provides more opacity.
I love this print so much it's freaking ridiculous. I definitely need a little more practice at it since her original is a million times better than my recreation, but I'm happy with regardless.
Thanks for looking!
Wednesday, January 23, 2013
YouTube Nail Art Week - Unicorn Germs
Hi everyone!
Welcome to Day 3 of YouTube Week!
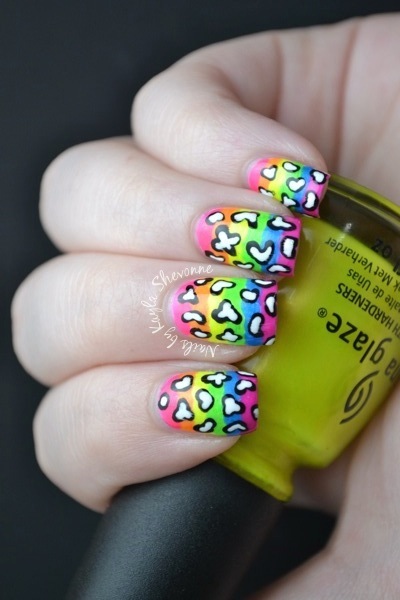
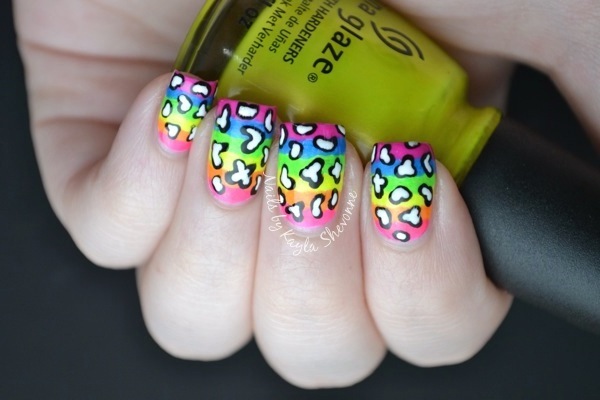
I couldn't do a YouTube Week without recreating a design from one of my favourite YouTube nail artists - . She and I seem to have a similar aesthetic - lots of rainbow, neon and animal print! The I picked to recreate incorporates all three of those elements. Well, sort of anyways. The animal print part is questionable. ;)
To recreate this whimsical "unicorn germs" design, I first started with a base of a white polish (Sinful Colors Snow Me White). I then used a dotting tool to create horizontal stripes using neon rainbow polishes. The ones I used are China Glaze Love's Beach, Orange You Hot?, Sun-Kissed, I'm With the Lifeguard, Splish Splash and Breach Cruise-r, all of which are from the Summer Neons Collection.
Once my rainbows were dry, I added the germs first in black and then filled them in almost all the way with white, leaving just an outline of the black. I did all this with a small dotting tool.
I think only she would come up with such a cooky design, but I absolutely love it!
Thanks for looking! See you tomorrow with another YouTube recreation!
Welcome to Day 3 of YouTube Week!
I couldn't do a YouTube Week without recreating a design from one of my favourite YouTube nail artists - . She and I seem to have a similar aesthetic - lots of rainbow, neon and animal print! The I picked to recreate incorporates all three of those elements. Well, sort of anyways. The animal print part is questionable. ;)
To recreate this whimsical "unicorn germs" design, I first started with a base of a white polish (Sinful Colors Snow Me White). I then used a dotting tool to create horizontal stripes using neon rainbow polishes. The ones I used are China Glaze Love's Beach, Orange You Hot?, Sun-Kissed, I'm With the Lifeguard, Splish Splash and Breach Cruise-r, all of which are from the Summer Neons Collection.
Once my rainbows were dry, I added the germs first in black and then filled them in almost all the way with white, leaving just an outline of the black. I did all this with a small dotting tool.
I think only she would come up with such a cooky design, but I absolutely love it!
Thanks for looking! See you tomorrow with another YouTube recreation!
Tuesday, January 22, 2013
YouTube Nail Art Week - Gradient Stripes
Hi guys!
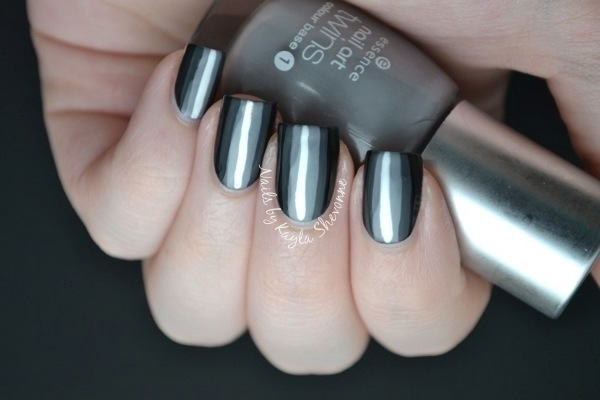
Welcome to Day 2 of YouTube Week! I chose today's design because it has a really cool effect, but it's super easy to do. In fact, all you need is four polishes from the same colour family ranging from dark to light. No special nail art tools required to recreate this design!
This design comes from YouTube user and her tutorial for .
I love green polish, so I was tempted to do the same as she did and create a green striped gradient. But I decided to switch it up a bit, so I went with a neutral colour palette instead.
First I started with a base of Wet 'n' Wild Black Creme on all of my nails. Then using the exact method she demonstrated in her tutorial, I created the gradient stripes using China Glaze Concrete Catwalk, Essence Romeo and Sinful Colors Snow Me White.
I really like how simple, yet visually appealing this mani is. I'm definitely going to have to try it again using some different colour families. I'm thinking a blue one would be really nice! And purple!
Thanks for looking!
Monday, January 21, 2013
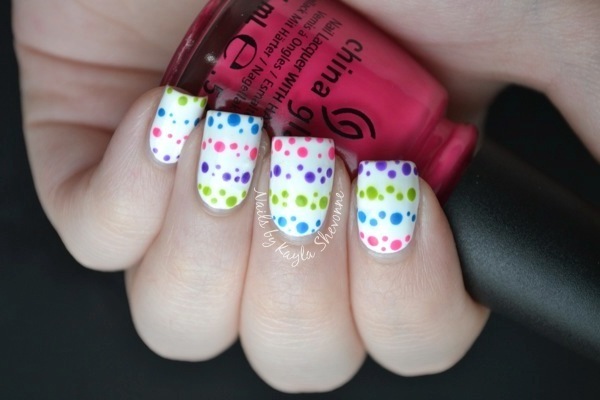
YouTube Nail Art Week - Polka Dots Stripes
Hi everyone!
So with nothing new to swatch right now, I decided to come up with a new week-long series of nail art! I've done Pinterest Week before, when I recreated designs that I pinned to my , so this time I'm doing YouTube Week, where I'll find seven nail art tutorials on YouTube and recreate the designs!
I'm excited about this because I know there's so many great nail artists out there to choose tutorials from. The hard part is going to be narrowing it down to seven!
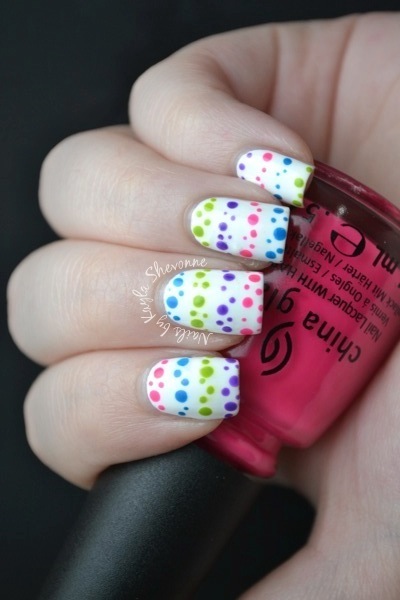
The first one I've chose is a tutorial by the user . I actually wasn't a subscriber until now, but as I was looking up which tutorials I would recreate, came up in the recommended section to the side of the video I was watching! How convenient, right?
For some of the tutorials, I might switch some colours up to better suit my own style, but I really liked the colours she used in her original design, so I went with those.
First off I started with a base of Sinful Colors Snow Me White. Then I used striping tape to section off four horizontal sections on each of my nails. Then using a small dotting tool, I added the dots in between each piece of tape using China Glaze Creative Fantasy, Def Defying, Escaping Reality and Hanging in the Balance. All four of those are from the Cirque du Soleil Collection.
I really like how this turned out! I've done my fair share of polka dot manis, but I don't think I would have ever thought to incorporate striping tape into one!
Thanks for looking! Hope you enjoy this series!
So with nothing new to swatch right now, I decided to come up with a new week-long series of nail art! I've done Pinterest Week before, when I recreated designs that I pinned to my , so this time I'm doing YouTube Week, where I'll find seven nail art tutorials on YouTube and recreate the designs!
I'm excited about this because I know there's so many great nail artists out there to choose tutorials from. The hard part is going to be narrowing it down to seven!
The first one I've chose is a tutorial by the user . I actually wasn't a subscriber until now, but as I was looking up which tutorials I would recreate, came up in the recommended section to the side of the video I was watching! How convenient, right?
For some of the tutorials, I might switch some colours up to better suit my own style, but I really liked the colours she used in her original design, so I went with those.
First off I started with a base of Sinful Colors Snow Me White. Then I used striping tape to section off four horizontal sections on each of my nails. Then using a small dotting tool, I added the dots in between each piece of tape using China Glaze Creative Fantasy, Def Defying, Escaping Reality and Hanging in the Balance. All four of those are from the Cirque du Soleil Collection.
I really like how this turned out! I've done my fair share of polka dot manis, but I don't think I would have ever thought to incorporate striping tape into one!
Thanks for looking! Hope you enjoy this series!
Saturday, January 19, 2013
Swatch Spam - Nicole by OPI Kardashian Kolors
Hey guys!
I usually pass on Nicole by OPI shades, simply because of their price (they're usually between $10 and $12 here). I guess the price isn't too bad, but considering that I get regular OPI shades for half that with my professional discount, it does feel expensive to me.
However, recently I picked up a few Nicole by OPI polishes through a blog sale for about $2 a piece! It was a great deal and the seller was super generous (thanks again Farrihn!). Most of the ones I picked up are from the Kardashian Collections, but there's also a few others that I'll show you some other time.
There's been a few Kardashian Kolors Collections released, so I had to do a little googling to find out which release each of these shades came out with.
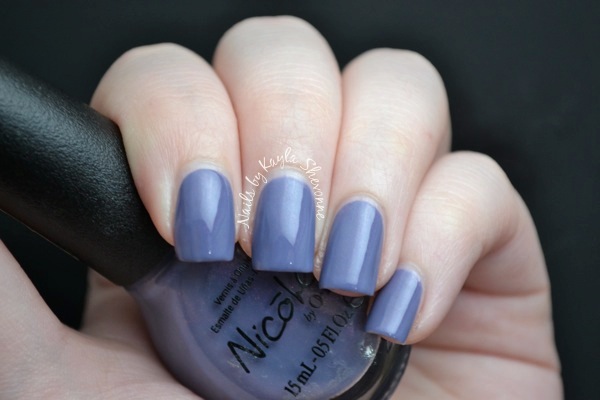
Back to Reality...TV is a dusty purple with subtle red-pink shimmer. This one was released in Spring 2012 and it was a CVS exclusive. The shimmer in the bottle looks really pretty, but it's not all that noticeable once on the nail. The formula was a bit sheer, so I did need three coats for my swatch.
Follow Me On Glitter is a dark, grey-silver base with lots of black and silver glitter. There's also scattered multicoloured glitters as well. This one was released for Holiday 2011. I actually received this one as a gift long ago, but had never swatched it, so I figured now was a good time. I wish there were more of the rainbow glitters, but besides that, I love this. Plus, the formula was really great. My swatch shows two coats.
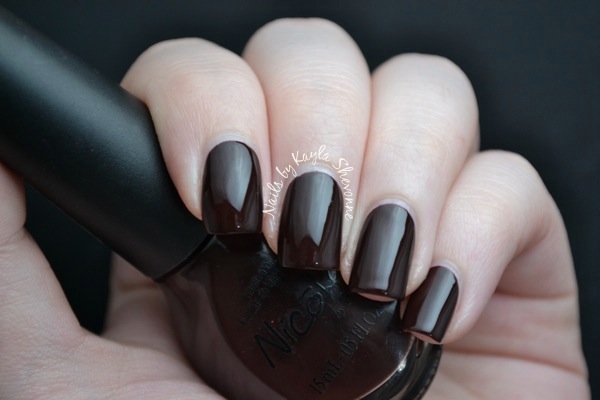
Hard-Kourt Fashionista is a rich, dark chocolate brown. I actually don't have a go-to dark brown creme, but I think this will be it! It's so shiny and goes on so smooth. I've shown two coats below.
It's All About the Glam is a shimmering white. It was released with the first round of Kardashian Kolors back in 2011. This one, along with another that you'll see in a minute, really bummed me out. I wanted to love it because the colour is super pretty and delicate, but the formula/application made it difficult to love. It was sheer and patchy and I needed four coats to get the opacity you see below. I guess I could layer it over a white creme, but I'm not sure that would help with the patchyness.
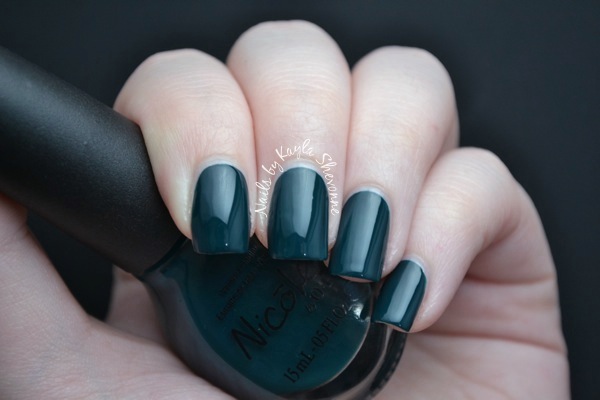
Khloe Had a Little Lam-Lam is a deep teal creme. This one was also released with the first round of Kardashian polishes and I've known since first seeing them that I would love this one. I wasn't disappointed. It's a lovely colour and the formula was great. My swatch is two coats.
Kim-pletely in Love is a shimmering light baby pink. This is the other one that I wanted to love but just couldn't because of the formula/application. Just like It's All About the Glam, Kim-pletely in Love was sheer and patchy and needed four coats to get to the opacity you see below, which still isn't full opacity.
Ladies in the Limelight is a slightly green-toned yellow creme. This was another CVS exclusive released for Spring 2012. Great colour, bad formula. Surprise, surprise, a yellow with a bad formula. It was streaky, patchy and needed three coats. It looks good once top coated and evened out, but the question is if it's worth the trouble.
Smile for the Glam-era is a dark burgundy-purple with lots of glowy gold and purple microglitter. This was a total surprise favourite for me! In the bottle it looked like a brown instead of a purple, so I wasn't very excited about it. But once I started applying it, I realized just how pretty it is. The formula was really good and I've shown two coats below.
Some of these shades are still available in drugstores in my area, so I assume they're not hard to find.
Thanks for reading and have a great day everyone!
I usually pass on Nicole by OPI shades, simply because of their price (they're usually between $10 and $12 here). I guess the price isn't too bad, but considering that I get regular OPI shades for half that with my professional discount, it does feel expensive to me.
However, recently I picked up a few Nicole by OPI polishes through a blog sale for about $2 a piece! It was a great deal and the seller was super generous (thanks again Farrihn!). Most of the ones I picked up are from the Kardashian Collections, but there's also a few others that I'll show you some other time.
There's been a few Kardashian Kolors Collections released, so I had to do a little googling to find out which release each of these shades came out with.
Back to Reality...TV is a dusty purple with subtle red-pink shimmer. This one was released in Spring 2012 and it was a CVS exclusive. The shimmer in the bottle looks really pretty, but it's not all that noticeable once on the nail. The formula was a bit sheer, so I did need three coats for my swatch.
Follow Me On Glitter is a dark, grey-silver base with lots of black and silver glitter. There's also scattered multicoloured glitters as well. This one was released for Holiday 2011. I actually received this one as a gift long ago, but had never swatched it, so I figured now was a good time. I wish there were more of the rainbow glitters, but besides that, I love this. Plus, the formula was really great. My swatch shows two coats.
Hard-Kourt Fashionista is a rich, dark chocolate brown. I actually don't have a go-to dark brown creme, but I think this will be it! It's so shiny and goes on so smooth. I've shown two coats below.
It's All About the Glam is a shimmering white. It was released with the first round of Kardashian Kolors back in 2011. This one, along with another that you'll see in a minute, really bummed me out. I wanted to love it because the colour is super pretty and delicate, but the formula/application made it difficult to love. It was sheer and patchy and I needed four coats to get the opacity you see below. I guess I could layer it over a white creme, but I'm not sure that would help with the patchyness.
Khloe Had a Little Lam-Lam is a deep teal creme. This one was also released with the first round of Kardashian polishes and I've known since first seeing them that I would love this one. I wasn't disappointed. It's a lovely colour and the formula was great. My swatch is two coats.
Kim-pletely in Love is a shimmering light baby pink. This is the other one that I wanted to love but just couldn't because of the formula/application. Just like It's All About the Glam, Kim-pletely in Love was sheer and patchy and needed four coats to get to the opacity you see below, which still isn't full opacity.
Ladies in the Limelight is a slightly green-toned yellow creme. This was another CVS exclusive released for Spring 2012. Great colour, bad formula. Surprise, surprise, a yellow with a bad formula. It was streaky, patchy and needed three coats. It looks good once top coated and evened out, but the question is if it's worth the trouble.
Smile for the Glam-era is a dark burgundy-purple with lots of glowy gold and purple microglitter. This was a total surprise favourite for me! In the bottle it looked like a brown instead of a purple, so I wasn't very excited about it. But once I started applying it, I realized just how pretty it is. The formula was really good and I've shown two coats below.
Some of these shades are still available in drugstores in my area, so I assume they're not hard to find.
Thanks for reading and have a great day everyone!
Friday, January 18, 2013
New Tutorials Page!
Hey guys!
I just have a quick second post today to introduce you to a project I've been working on this week. I'm sure a lot of you have been to my tutorials page before, and you remember it looking like this:
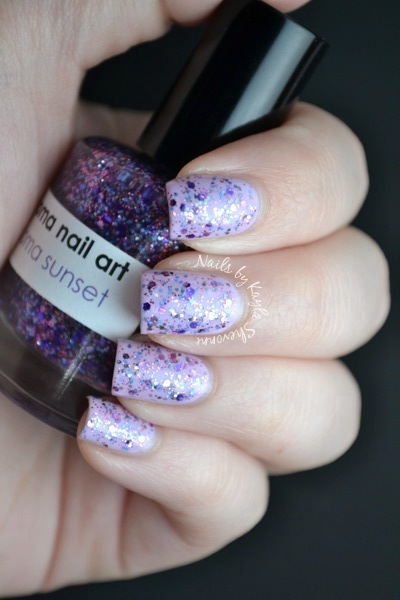
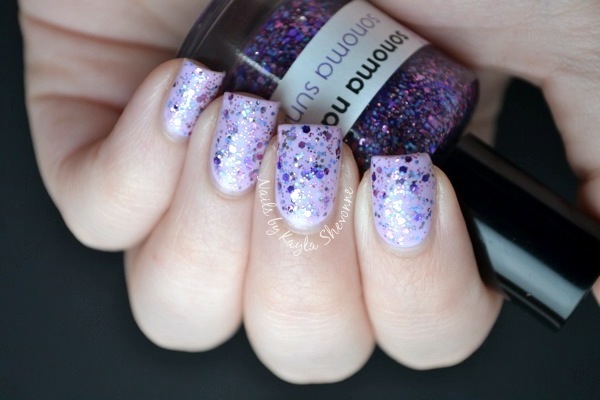
Sonoma Sunset is a clear base with a beautiful mix of purple, pink and blue glitters. I had a hard time deciding what to layer this over because I think it will work well over so many colours. But in the end I decided to go with OPI Rumple's Wiggin' as my base colour. I like this combination a lot, but I'm definitely going to have to see what other "underwear" this would work well over.
Sonoma Nail Art is one of my absolute favourite indie brands, but I'm obviously not the only one who feels that way because it is so hard to get her polishes. They usually sell out in a minute or less, so I've basically given up on even trying to get my hands on them.
With that said, Michelle is having another sale today! The sale begins at 10:00am Pacific Time (1:00pm Eastern). This isn't one of the shades that will be available, but the five that will be available are all awesome (duh).
Here's a link to her etsy shop, so make sure you're there on time if you want to snag any of the polishes! And if you miss this sale, you can keep up with Sonoma Nail Art for future sale dates.
I just have a quick second post today to introduce you to a project I've been working on this week. I'm sure a lot of you have been to my tutorials page before, and you remember it looking like this:
Sonoma Sunset is a clear base with a beautiful mix of purple, pink and blue glitters. I had a hard time deciding what to layer this over because I think it will work well over so many colours. But in the end I decided to go with OPI Rumple's Wiggin' as my base colour. I like this combination a lot, but I'm definitely going to have to see what other "underwear" this would work well over.
Sonoma Nail Art is one of my absolute favourite indie brands, but I'm obviously not the only one who feels that way because it is so hard to get her polishes. They usually sell out in a minute or less, so I've basically given up on even trying to get my hands on them.
With that said, Michelle is having another sale today! The sale begins at 10:00am Pacific Time (1:00pm Eastern). This isn't one of the shades that will be available, but the five that will be available are all awesome (duh).
Here's a link to her etsy shop, so make sure you're there on time if you want to snag any of the polishes! And if you miss this sale, you can keep up with Sonoma Nail Art for future sale dates.
Subscribe to: Posts (Atom)