Friday, August 31, 2012

The 31 Day Challenge

Hi everyone!

From the title of this post, it's obvious that I've decided to participate in the 31 Day Challenge for the month of September! This is both terrifying and exciting for me because it's such a daunting task to post new nail art for 31 days straight, but I know it's going to be a blast!

And as you'll be seeing in your readers, there are several other bloggers participating as well!

In case some of you aren't familiar with the 31 Day Challenge, here's the lineup of manicures that you'll be seeing this month.


On many of these days, you'll be seeing more than one post from me since I'll still be trying to keep up with my regular posting (ie: swatches, collection reviews, etc). So you'll be seeing a lot from me in the month of September!

If any of you are interested in joining in the fun, you can grab the image above or you can choose from a few different versions done up by Sarah of Chalkboard Nails.

I hope you're all as excited as I am about the month ahead! See you tomorrow with my Day 1 manicure!

Sonoma Nail Art - My Three Glitters

Hey guys!

Today I have a great indie polish by to share with you! I'm lucky enough to know the creator of Sonoma Nail Art polishes, Michelle, through a group of mutual polish friends, and not only does she create stunning polishes, she's also super sweet!

The polish I'll be showing you is called My Three Glitters and it's a clear base consisting of different sizes and shapes of black and white glitter. There's hexagonal, bar, square and diamond glitters in here!


Here I've shown one coat of My Three Glitters over a sort of unusual pairing of colours - Zoya Mitzi with an accent nail of Zoya Lolly, both of which are from the Mod Mattes Collection.


The formula of My Three Glitters was good - a little thick, but definitely not to the point of being difficult. I had to do a small amount of glitter placing with the brush, but it was mostly to get a couple of the larger glitter pieces to sit where I wanted them to.


I used top coat in the above photos, which obviously voided the matte effect of the base colours. Not to worry though, I re-mattified the whole manicure below. And I think I actually prefer it matte!


Sonoma Nail Art polishes can be purchased on Etsy for $10 a bottle. Surprisingly, My Three Glitters is actually in stock right now! Snatch it up before it's gone!

You can keep up with future stock dates and other information via the . And while you're there, be sure to check out photos of Michelle's upcoming Halloween Collection! It looks amazing!

Thursday, August 30, 2012

Review & Swatches - Silky Polish: Polish With a Conscience

Hey everyone!

Today I have a new brand to share with you - Silky Polish: Polish With a Conscience. And before I share some swatches with you, I want to give you some information about the brand.

Silky Polish is 5-free, non-toxic, hypo-allergenic and pregnancy-safe. It's certified vegan and cruelty-free as well as eco-friendly. The bottles and kits are completely recyclable, the kit boxes are made from 100% post-consumer recycled paper and all printing is in soy ink.

With all that said, we nail polish addicts still need a quality nail polish, so let's take a look to see if Silky Polish also delivers in that respect.
_________________________________________________________________________________________________

This is the Vibrant Silks Kit which includes three polishes (Dupion Tang, Tussah Glow and Viole Serenade), the Silky Herbal Remedy Base Coat, the Silky Wet Look Topper Top Coat as well as a detail nail art brush.


As you can see, the products come packaged in this really classy magnetic-closure box.

I won't be storing the polishes in this box since they'll be joining my other polishes in my melmers, but it can come in handy when storing other nail supplies. For example, nail art brushes/dotting tools or nail art decorations such as rhinestones and studs. You could even use this to store stamping plates and stamping supplies!


Here's a closer look at the products that come with this kit. Before I get to the swatches, I'll discuss the Silky Herbal Remedy Base Coat, the Silky Wet Look Topper Top Coat.

The Silky Herbal Remedy Base Coat is infused with vitamins and nutrients (such as Vitamin E and Equisetum herb) that help keep your nails healthy and strong. It can be used as a daily remedy to strengthen and heal nails (apply 3 times a week) or as a base coat to protect your nails before polish application.

I've been using it as a base coat since I got it and since that's not a very long test period, I can't speak of the healing and/or strengthening properties of it quite yet, but it does work well as a base coat for polish. I will continue using this as my go-to base coat over the next month or so and then I'll update this post with my thoughts.

The Silky Wet Look Topper Top Coat works really well to give that super shiny "wet" look to a manicure. It doesn't dry as fast as say Seche Vite does, but I did find that it's not as thick as Seche Vite, which I like.


Now let's get to the swatches!

First up is Dupion Tang, a bright and tropical orange creme. I have a couple of go-to orange shades in my stash and this one has just landed itself a spot in that mix. The formula is really great and easy to work with and my swatch is two coats.


Tussah Glow is a buttery lemon yellow creme. This doesn't suffer from some of the problems that yellow polishes often suffer from (ie: patchy and difficult formulas). This glided on smoothy and was opaque in three coats.


Last up is Viole Serenade, which is a bright candy pink creme. I really love how pinks like this one look against my fair skin! The formula was good like the other two I tried and my swatch is two easy coats.


Since the kit also came with a nail art brush, I decided to use it to add a couple of stripes to Tussah Glow using both Dupion Tang and Viole Serenade. The brush is a good quality one and I find that it's best for doing striping work since the bristles are on the longer side.


It's not often that I test longevity of polishes, mostly because I typically change my polish every couple of days. However, I had read other reviews of this brand that mentioned their longevity, so I decided to test it out for myself.

After swatching these, I left Viole Serenade on my nails for four full days. I used both the Silky Herbal Remedy Base Coat and the Silky Wet Look Topper Top Coat in this test as well. When I removed the polish, I had tip wear, but no chips anywhere. I was itching to change my polish after so long (long for me, anyways!), but I think four full days is pretty good!

With ALL of that said, I'll keep my conclusion of this post short. I'm impressed with all of the Silky Polish products and I love the values behind the brand.

You can purchase Silky Polish products on their website and each 15ml polish/treatment retails for $12.50. The shade collection isn't huge, but there's a good variety of colours and finishes to choose from.

The Vibrant Silks Kit retails for $49.50, which means that you're getting each of the polishes/treatments for a sale price of $9.90. And don't forget that you get the nail art brush and the box as well, so when you factor those in, it's an even better price!

Of course, an even better price would be FREE! In the near future, I'll be offering a Silky Polish giveaway! Look out for it.

The product(s) in this post were provided by the manufacturer or their PR in exchange for an honest review.

Wednesday, August 29, 2012

KBShimmer Fall Collection

Hi guys!

Today I have an indie brand that's new to the site - it's ! This brand offers not only handmade polishes, but also an array of bath and body products such as soaps, scrubs, lotions, etc.

The polishes I'm going to be showing you are from the new KBShimmer Fall 2012 Collection that's set to release on September 1st. There are eight shades in this collection and today I have four of them for you.

Let's get right to it!

I Made a Bleu Bleu is an electric royal blue that's packed with purple, green and gold shimmer. You know how sometimes certain glitter polishes are called "glitter bombs" because they're so packed with glitter? Well then this polish would have to be called a shimmer bomb because it has so much shimmer! My swatch is two coats and the formula was great.


No Whine Left is a gorgeous dark plum base packed with a mix of blue, purple and fuchsia hex glitters in various sizes. I'm basically in love with this polish. And to boot, the formula is excellent, it covered in two coats and I didn't have to do any placing of glitters. Gah! Love!


Oh Splat! is a white jelly polish with rainbow coloured hex glitters in various sizes. This is a very fun polish and you all know how much I love anything to do with rainbows! My swatch is three thin coats and the formula of this is really good - it flowed nicely and evenly and I didn't have to do any glitter placing.


Last, but certainly not least is Quantum Leaf. This is a warm, rustic mustard-y orange base with orange, copper, gold and red hex glitters in various sizes. This screams fall to me and makes me think of a big pile of leaves. I haven't seen anything quite like this before and I love me a unique, interesting polish! The formula is great with this one as well and my swatch is three thin coats.


Overall, these four polishes are all big winners and this was a great introduction to the KBShimmer brand for me. And I definitely need to get my hands on the rest of this Fall Collection!

The KBShimmer Fall 2012 Collection will be available on September 1st on the Harlow & Co. website. Each shade retails for $9.00 each.

To keep up with the KBShimmer brand and to see the rest of the colours from this collection, check them out .

The product(s) in this post were provided by the above retailer in exchange for an honest review.

Tuesday, August 28, 2012

OPI & Polish, Eh?!? Glitter Sandwich Manicure

Hi everyone!

Today I have a simple yet fun glitter sandwich to show you!

A short while ago I showed you a couple of polishes from the Canadian indie brand Polish, Eh?!? (see the post here). I said in that post that one of them, Gumballs, would work really well in a glitter sandwich, so that's been on my to-do list ever since.

Let's take a look!


I tested out a few different combinations before deciding on what polish colour to use in my glitter sandwich, but in the end I landed on nude with an accent nail of pink. I also tested Gumballs out in an orange glitter sandwich, as well as a blue one and I liked those also.


To get this look, I started with a base colour of OPI Don't Pretzel My Buttons on all of my nails with the exception of my ring finger, on which I used OPI Do You Think I'm Tex-y?.

I then added two thin coats of Polish Eh?!? Gumballs to all of my nails.

To create the sandwiched effect, I added a thin coat of OPI So Many Clowns...So Little Time over the nude nails and a thin coat of OPI Do You Think I'm Tex-y? to my accent nail.


Of the two looks, I think I might prefer the pink sandwich just a bit more. Although the nude sandwich does a really good job at allowing the true colours of Gumballs to show through! I guess I'll just call it a tie!

What do you guys think? Which glitter sandwich do you prefer?

Monday, August 27, 2012

It's So Easy Nail Art Review

Hey guys!

Today I have some fun nail art products to share with you! The It's So Easy brand offers an array of different products to help make nail art easier for everyone from beginners to experts.

The It's So Easy lineup is pretty huge, but I've got a good variety of things to show you today. I have six of the striping polishes, as well as four pots of loose glitter.

FYI: this post is huge, so brace yourself!


The striping polishes come in three different varieties. The first variety are the Stripe Rite Paint shades which are mostly cremes as well as some metallics. There are 58 of these shades in total, so you should be able to find any shade you need. The second type is the Stripe Rite Glitter Paint which include 39 shades of glittery striping polishes. Finally, the third variety are the Stripe Rite Metal Paints, which are 6 chrome stripers.

All of the stripers that I tried work quite well and the brushes are super thin so you can make some really fine details and stripes. I used to use stripers a lot in my nail art but kind of gave up on them when I found my trusty striping brush. However, the brushes on these stripers are even thinner than my brush and they actually work better! I was pleasantly surprised.

Aside from the brushes, there are other important aspects of these striper polishes that must be mentioned. First, the cap on these striper polishes are tapered and they have ridges so that they're easy to hold and control. And probably most importantly, the formula is good on all six of the ones I tried.

For reference, I've included a couple of photos showcasing the brush. The first photo features the brush alone and the second photo shows the brush next to a regular sized polish brush (China Glaze) for size comparison.


Of the four glitter pots I have to show you, two are a fine glitter powder (appropriately named Glitter Powder), while the other two are of the flakie shard variety (called Cracked Ice).

Each of the pots is 2oz. in size and let me tell you, you'll get a lot of manicures out of that.

I found that that the easiest way to apply the fine glitter powder was to just sprinkle it on top of wet polish (but do this over a paper plate so you don't make a huge glittery mess and you can easily return the excess glitter to the pot). I then just tapped the excess off onto the plate and used a fan brush to brush away any excess that didn't fall off with the tapping.

In regards to the shard glitter, I tried both sprinkling it on and placing it with the end of a dotting tool. Both methods work, but which method you use is just going to depend on what look you're going for (I've shown you both looks below, so you can make your choice once you see them).


Now let's get to the fun part and take a look at the nail art designs I came up with using these products!

On my index finger, I used a base of China Glaze Traffic Jam and then created the v-gap using the Stripe Rite Glitter Paint in the shade Gold.

My middle finger features a base of China Glaze Gamer Glam with the loose Glitter Powder in Lavender on top.

On my ring finger, I started with a base of China Glaze White on White and then sectioned off one half of the nail using Stripe Rite Paint in the shade Hot Chartreuse. Then, I used the Stripe Rite Paint in Black to add a couple of simple stripes on the other side.

Finally, my pinky finger features the Cracked Ice Powder in Neon Pink sprinkled over a base of China Glaze Flirty Tankini. I used the sprinkling method for this look and as you can see, there's really good coverage this way and it created a really unique 3D look.


On my index finger this time, I started with a base of China Glaze For Audrey. Then, using the Stripe Rite Paint in White, I created a chevron french tip. You could stop there and still have a fun design, but I decided to take it one step further and add an extra chevron using the Stripe Rite Paint in Bright Pink.

My middle finger features a base of China Glaze C-C-Courage with the loose Glitter Powder in Purple on top.

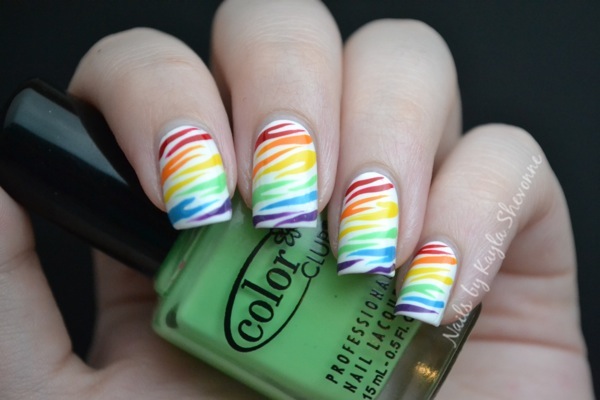
On my ring finger, I started with a base of China Glaze Re-Fresh Mint and then added some zebra stripes using the Stripe Rite Paint in Green Grass. These stripers are really good for freehand zebra print!

Finally, my pinky finger features a diagonal section of the Cracked Ice Powder in Holographic Gold over a base of China Glaze Meteor Shower. This look was done by using a dotting tool and individually placing the shards onto the nail. As you can see, you get less coverage this way but you have more control over where the shards are placed.


In this final set of designs, my index finger features a quick leopard print design using China Glaze Lemon Fizz as the base and the Stripe Rite Paints in White and Bright Pink for the leopard spots. I found it easier to do the zebra print than I did leopard print with the stripers, but it still turned out ok.

On my middle finger, I've used China Glaze Unpredictable as the base colour and then added simple stripes of varying sizes using the Stripe Rite Paint in Black.

My ring finger features a base of China Glaze Gothic Lolita and I created a feather french tip by using the Stripe Rite Paint in White.

Finally, on my pinky I've done a simple explosion design using China Glaze Splish Splash as a base and the Stripe Rite Paint in Hot Chartreuse for the explosion.


Overall, I'm quite happy with all of these products. The stripers in particular will be making their way into my regular nail art designs and I'll be heading to Sally Beauty Supply soon to pick up some of the other available colours. The fine glitter powder can create some really eye-catching glitter bomb manicures and the flakie shard glitter can create some really unique and interesting manicures.

With that said, the one negative thing I have to say about these products is that there are no names on the labels. I know that all the products have their own names because I was able to find them on the It's So Easy website as well as on the Sally Beauty website, but mine definitely do not have names. I'm wondering if this may be because the ones I have are samples, and if that's the case, all of the retail products should have the names on the labels.

You can find the It's So Easy product line at Sally Beauty Supply stores as well as on the Sally's website. Fortunately, not only are the products so easy to use (see what I did there?), they're also really affordable. The stripers retail for $1.99 each and the glitter powders are $3.99 per pot.

And keep in mind that Sally's frequently sends out coupons to their Beauty Club members, so you should be able to get these products for even cheaper still!

The product(s) in this post were provided by the manufacturer or their PR in exchange for an honest review.

Saturday, August 25, 2012

A Different Take on Rainbow Zebra Print Nails

Hi guys!

Tonight I'll be going to my favourite Aunt's 50th birthday party and I needed an awesome nail art design for it. She loves rainbows (I guess it runs in the family), so I knew I had to incorporate rainbow colours into my design.

I was also in the mood for some zebra print nails since I haven't done a zebra design in months! However, I didn't want to go the traditional route and do a rainbow background with black zebra stripes, so instead I went with a white background and made my zebra stripes using rainbow colours!


I started with a base of white using Wet 'n' Wild French White. Then, using a striping brush, I freehanded on the zebra stripes using six rainbow-coloured polishes.


The red is China Glaze Salsa, the orange is China Glaze Papaya Punch, the yellow is Color Club Almost Famous, the green is Color Club Twiggie, the blue is Zoya Robyn and the purple is OPI Funky Dunkey. For the most part, I did two zebra stripes of each colour, but if your nails are shorter and you still want to try this design, just go for one stripe of each colour.


I love how this design turned out and I'm sure my Aunt will as well!

Enjoy your Saturday everyone!

Friday, August 24, 2012

Swatch Spam - Essence Colour & Go

Hi everyone!

I had a pretty major swatch-a-thon last weekend, so you'll probably be seeing a few swatch spam posts over the next little while! Today it'll be an Essence swatch spam post!

Recently my local Shopper's Drug Mart (a Canadian drugstore chain) got in the new bottles of the Essence Colour & Go line and there are a few new shades in this lineup that weren't originally available when they first starting carrying Essence. They also had a BOGO sale a couple of weeks ago, so I took advantage of that sale and picked up several of the new shades, plus some of the older ones that I didn't already own. Today I'll be showing you six, but I'll definitely have more to show you soon.

First up is Break Through, a nice amethyst purple creme. This doesn't look like it's a very unique colour, but I don't think that I own anything quite like this. The formula was very good and my swatch is two coats.


Date in the Moonlight is a deep teal-leaning blue with flecks of blue microglitter. The shimmer translates quite well on the nail with this one! The formula was great and my swatch is two coats.


Gorgeous Bling Bling is a rustic orange with small gold flecks throughout. It's a little reminiscent of the shimmery polishes from the OPI Holland Collection. The formula was a little thicker than the others, but not difficult to work with. It was almost opaque in one coat, but I did two for good measure.


Oh My Glitter! is a light lilac packed with blue and pink shimmer. It's very pretty and feminine looking! I like it a lot. It's on the sheer side, but it builds up nicely with three coats.


Party Princess is a sheer pink base packed with iridescent glitter. This reminds me of OPI I Lily Love You, except with glitter instead of flakies. I've shown one coat of Party Princess over Essence Ultimate Pink, which you'll find a swatch of below. The formula was thick, but not difficult.


Ultimate Pink is a nice candy pink creme. I quite like how this shade looks against my fair skin! The formula was very good and my swatch is two coats.


I rather like the bottle and brush design for these new Colour & Go polishes! The brush is more tapered (think Sally Hansen Insta-Dri, but not as wide) than the old one and I find it conforms better to the nail. The bottle is also a bit bigger than the old one (8ml vs. 5ml)! More polish is always better than less polish, right?

The Essence Colour & Go polishes are available in Canada at Shopper's Drug Mart stores and they retail for $1.99 each. In the US, Essence can be found at Ulta and I'm pretty sure they retail for about $1.99 there as well. Essence is also available internationally.

Thursday, August 23, 2012

OPI - DS Sapphire

Hi guys!

I know I'm not the only one who gets a ridiculous amount of satisfaction from killing a nail polish lemming, right? Well, I recently killed another - this time it's OPI DS Sapphire.

Recently a friend of mine stumbled across a couple of bottles of this discontinued shade at a random CVS. Sapphire was on my wishlist (along with DS Glamour and DS Exclusive), so I bought one of her bottles from her immediately.

Let's take a look!


Sapphire is a pale, silvery blue with a linear holographic effect. These first two photos show what DS Sapphire looks like in natural lighting. The holo effect is still there, but it's very subtle in this lighting.


My swatch is three thin coats of DS Sapphire on its own. The formula was a little on the thin side, but not to the point of being watery or difficult to work with.

Since it's sheer and the pale blue colour is so subtle, this shade can also be used as a holographic top coat! It might add a very subtle blue tint, but I don't think it would be noticeable over most shades.


And of course, I had to include a flash photo to really show off the gorgeous linear holo effect!

I love this polish and I'm so happy to be adding it to my collection! Now to gets my hands on DS Glamour and DS Exclusive...

Since this shade is discontinued, it's no longer readily available. There's currently a few listings on eBay, but the cheapest one is about $27. However, like I said above, my friend was able to find two bottles at a random CVS for regular price, so it might be worth it to check out any CVS stores in your area! You never know!

Wednesday, August 22, 2012

JENsations Swatches & Review

Hi guys!

Today I have another fairly new indie brand to share with you! This one is called JENsations and the creative mind behind this brand, Jen, was kind enough to send me a few of her polishes to try out.

Let's get right to it.

First up is Be My Valentine, which is a mix of light and dark pink hex glitters and light pink heart glitters in a clear base. I've layered it here over a simple white creme. Application can be tricky - I had to place many of the glitters, but if you have a little patience with it, this can look really neat.


Bumble Bee is a clear base with a mix of differently sized bright yellow, black and white hex glitters. The yellow hexes make up the majority of the combination while the black and white glitters are sort of sprinkled amongst.

I've layered one coat of Bumble Bee over a base of Color Club Almost Famous, which I think is a great combination. The end result reminds me of honeycombs, which is quite appropriate given the name of this polish. The formula was the best of the three shades here and only required a little placing, mostly for the black and white glitter pieces.


Queen of Hearts is a clear base with bright red heart and black diamond glitters. For my swatch, I've layered Queen of Hearts over China Glaze Cheers to You - a straight-up silver foil.

Application was tricky with this one and I had to place most of the glitters with the brush. I also had to fish a lot of them out of the bottle because not many would come out with the brush. Maybe the glitter to clear base ratio should be a little higher with this one? Nonetheless, the end result is interesting if you're willing to work with it.


These polishes are fun and Jen has branded herself well by using a unique star-shaped bottle for her polishes. JENsations polishes can be purchased on Etsy and each 10ml bottle retails for $7.50. All three of these shades are currently in stock.

The product(s) in this post were provided by the manufacturer or their PR in exchange for an honest review.

Tuesday, August 21, 2012

Geometric Tuesday - I can't even think of a title for this design...

Hi everyone!

Welcome to another nail art collaboration! This time around the theme is "geometric", so you should be seeing some really interesting and fun manis in your reader today!

I actually wasn't going to participate in this one, but I decided at the very last minute (about 12am last night) that I wanted to. Then there was the issue of coming up with a design, which proved to be less than easy at that time of night. So basically, I chose a few colours and just went for it, with no particular plan. I ended up with this completely random v-gap/funky chevron french mani that I actually quite like!


To do this design, I started out with a base of Wet 'n' Wild French White on my accent nails. I then painted all of my non-accent nails using China Glaze Love's a Beach from the Summer Neons Collection. I also used that colour to create the v-gap on my index nail and the chevron french tip on my middle nail with a striping brush.


After that, I went in with a small nail art brush and a black polish (OPI Black Onyx) and freehanded some random geometric lines and shapes on my index nail. There's really no rhyme or reason to these shapes, I just went for it.

On my middle nail, I used the same brush and black polish to create some vertical zig zags. The zig zags aren't as neat or consistent as I would have liked, but there was no way I was going back and re-doing everything.


I'm quite happy with how this random geometric manicure turned out! I like how I did both of my accent nails differently, but they still go together nicely. Plus, black, white and pink always go well together!


Monday, August 20, 2012

Lush Lacquer Giveaway!

Hi everyone!

That's right, it's giveaway time again! This time I've collaborated with the lovely girls from Lush Lacquer to bring you this awesome giveaway! I'm not celebrating anything in particular right now, I just love you guys and I want to offer you the chance to win some cool polishes!


The winner of this giveaway will receive three brand new Lush Lacquer polishes! The shades include three of their most popular ones: Mr. Bubbles (swatch), Lite Brite (swatch) and Pink Panther (swatch). I made sure to pick shades that I have personally tried and that I recommend.

A big thanks goes out to the girls from Lush Lacquer for generously donating these polishes for the giveaway!

a Rafflecopter giveaway

This is the last giveaway I have planned for a while, so be sure to get your entries in for a chance to win this amazing prize!

Good luck everyone!

Sunday, August 19, 2012

Random Swatch Spam - China Glaze, Essie & Orly

Hi everyone!

I know I'm not the only one who is always looking for new places online to purchase nail polish. Well recently I was approached by an online retailer called Beauty Stop Online to review some of the polishes that they sell.

Beauty Stop Online offers brands such as China Glaze, Essie and Orly and their large stock consists of both new and older collections. Best of all, their prices are quite good and they offer international shipping.

Let's check out some of the polishes I picked to review!
_________________________________________________________________________________________________

First I'll show you the China Glaze polishes that I chose.

Fiji Fling is the namesake of the Spring/Summer 2006 Fiji Fling Collection and it's a sheer coral-pink with pinkish gold shimmer. The shimmer is definitely much more noticeable in person than it is on camera. This goes on sheer, so I layered two coats over a white creme. The formula was quite good, which made the application effortless.


Sky High Top is a bright sky blue with subtle shimmer. This one is from the Summer 2009 Kicks Collection, which is an awesome collection in my opinion and I'm happy to be adding another of the Kicks polishes to my stash. My swatch is two coats and the formula was really good.


_________________________________________________________________________________________________

Next up are the two Essie polishes that I chose.

Navigate Her is the namesake polish from the recent Spring 2012 Navigate Her Collection. There were a few colours from this collection that stood out to me, but Essie is just way too expensive here, so I didn't pick any up myself. Navigate Her is a light yellow-toned green creme. I like this shade a lot and I don't think I have anything quite like it. My swatch is two coats and the formula was very smooth and easy to apply.


She's Picture Perfect is another recent release, this time from the 2012 Resort Collection. It's a light lavender with subtle pink shimmer. The shimmer is subtle, but it's mostly visible under bright light. You can kind of see it in the bottle near my nail tips. The formula was on the thin side, but it was easy to work with and opaque in two coats.


_________________________________________________________________________________________________

I picked two Orly shades to review as well and both of them are from the recent Summer 2012 Feel the Vibe Collection.

After Party is a dark blue-black with heavy blue, pink and purple shimmer. This doesn't exactly feel like a summer shade to me, but it's amazing nonetheless! It does dry a bit flat though, so I added top coat for my swatch. The formula was on the thick side but not at all hard to work with and my swatch is two coats.


Glowstick is a retina-blinding neon yellow. Seriously, this is most neon polish that I've ever seen. And you guys know how much I love neons! I think this might actually be my favourite of all the polishes I'm showing you today! My swatch shows two coats of Glowstick over a white creme. The formula was good, but it can be patchy if you're not careful. Keep in mind, my photos are taken in natural light - there's no use of flash or anything like that, so it really is as bright as my photo shows!


_________________________________________________________________________________________________

As I said above, the prices on Beauty Stop Online are very good. China Glaze retails for $2.99 a bottle ($4.99 for the crackle shades), Essie retails for $5.99 and Orly polishes will run you $6.50 each ($7.59 for the black-capped FX polishes).

The product(s) in this post were provided by the above retailer in exchange for an honest review.
Newer Posts Older Posts Home